Butterfly Rangoli : Rangoli, the traditional Indian art form of creating colorful patterns on the floor, is a wonderful way to express creativity and celebrate special occasions.
One of the most captivating designs you can try is a butterfly rangoli.
Here’s a step-by-step guide to help you create a beautiful butterfly rangoli in just 10 easy steps.
Step 1: Gather Your Materials for Butterfly Rangoli
Before you start, make sure you have all the necessary materials:
- Colored rangoli powders
- A pencil or piece of chalk
- A small spoon or rangoli powder applicator
- A rangoli stencil (optional, but helpful for beginners)
Also Read : Top 10 Simple Rangoli Design
Step 2: Prepare the Surface
Choose a smooth, clean area for your rangoli. Sweep the surface to remove any dust or debris, as a clean surface ensures that the rangoli powder adheres better.
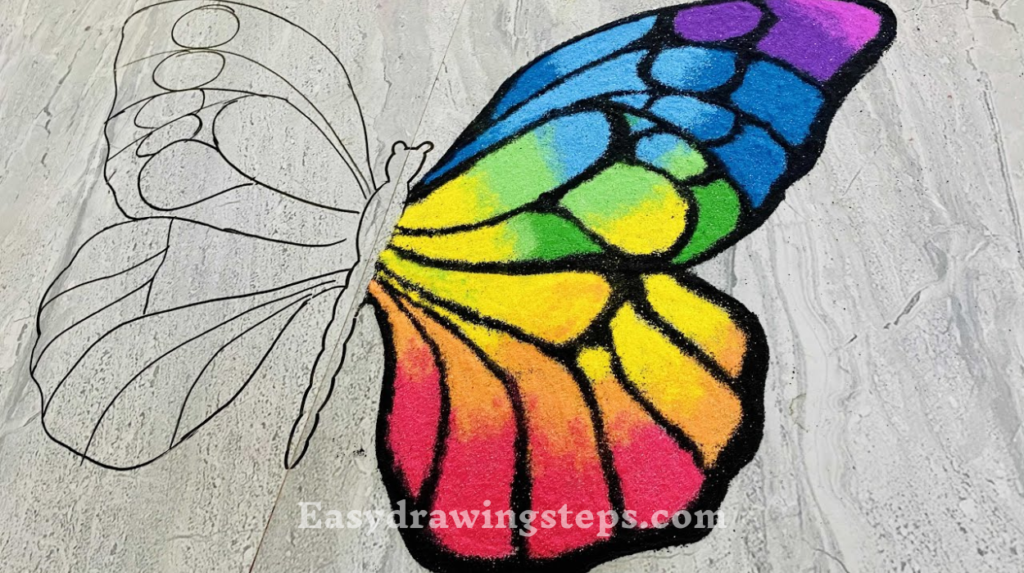
Step 3: Outline the Butterfly Shape
Using a pencil or chalk, lightly sketch the basic outline of a butterfly. Draw an oval shape for the body and two large, symmetrical wings extending from each side. If you’re not confident in freehand drawing, you can use a stencil to get a perfect shape.
Also Read : 10 easy steps to draw G20 Logo Drawing
Step 4: Divide the Wings
Now, draw patterns inside the wings to create different sections. You can use curves, circles, or any shapes you like. This step is crucial for adding intricate details and enhancing the overall design.

Step 5: Choose Your Colors
Decide on the colors you want to use for your butterfly. Bright, contrasting colors often look the best. Consider using colors that complement each other to make your rangoli vibrant and eye-catching.
Also Read : How to draw rangoli design easy simple
Step 6: Fill the Body
Start by filling in the body of the butterfly with rangoli powder. Using a dark color, such as black or deep brown, will make the body stand out against the colorful wings.
Step 7: Fill the Wings
Carefully fill in each section of the wings with your chosen colors. Use your fingers, a small spoon, or an applicator to control the flow of the powder. Make sure each section is neatly filled, and try to keep the edges sharp and defined.
Also Read : 10 easy steps to draw Baby Boy Drawing
Step 8: Add Details
Add finer details such as the antennae and additional patterns on the wings. You can use contrasting colors to highlight these details. A thin stick or toothpick can be handy for creating fine lines and small accents.

Step 9: Outline the Design
Once all sections are filled, outline the entire butterfly with a dark color. This step will help define the shape and make your butterfly rangoli pop. A sharp outline can also correct minor imperfections in the filling process.
Also Read : 10 easy steps to draw Afghanistan Flag Drawing
Step 10: Final Touches
After completing your butterfly, step back and assess your work. Clean up any stray powder to ensure sharp lines and a tidy appearance. You can also add extra decorative elements around your butterfly, such as flowers, swirls, or geometric patterns, to enhance the overall look.
Creating a butterfly rangoli is a fun and rewarding activity that brings beauty and festivity to any occasion.
By following these 10 easy steps, you can craft a stunning piece of art that showcases your creativity and adds a vibrant touch to your home.
Whether you’re celebrating a festival, welcoming guests, or simply enjoying a creative moment, a butterfly rangoli is a delightful way to express yourself. Happy rangoli making!
Small Butterfly Kolam with Dots
A small butterfly kolam with dots is perfect for those who want a quick and easy design. It involves creating a grid of dots, typically in a compact arrangement, and then connecting these dots to form a butterfly shape. This type of kolam is ideal for beginners or for those who have limited space but still want to create a beautiful and intricate pattern. The small size allows for a simple yet visually appealing design that can be completed quickly, making it a convenient option for daily practice or for adding a touch of decoration in a short amount of time.
Simple Butterfly Kolam with Dots
A simple butterfly kolam with dots focuses on ease and elegance. This design usually features a minimal number of dots arranged in a straightforward grid pattern. The simplicity lies in the uncomplicated lines and shapes used to connect the dots and form the butterfly. This approach is suitable for those who are new to kolam drawing or who prefer a clean, uncluttered look. Despite its simplicity, the design can be quite charming and effective in creating a pleasant decorative effect.
Butterfly Muggulu
Butterfly muggulu combines the traditional art of muggulu, which are geometric patterns commonly drawn in South India, with the graceful form of butterflies. Muggulu are often more structured and symmetrical, and incorporating butterflies into these designs adds a natural and delicate element. These patterns can vary in complexity, from simple outlines to more elaborate designs, making them suitable for various skill levels and occasions. Butterfly muggulu often carries cultural significance and is used to beautify spaces during festivals and special events.
Butterfly Birds Rangoli Designs
Butterfly birds rangoli designs creatively merge the features of butterflies and birds into a single artistic composition. This type of design involves more intricate detailing as it combines the characteristics of both creatures, resulting in a dynamic and lively pattern. These designs can be more challenging to create due to their complexity, but they offer a unique and visually captivating result. This fusion of elements adds an element of fantasy and charm, making the rangoli stand out.
Butterfly Rangoli Designs
Butterfly rangoli designs encompass a wide range of patterns and styles, from the simplest forms to highly elaborate creations. These designs can vary greatly in size and detail, allowing for a high degree of creativity and personalization. Whether incorporating traditional elements, modern twists, or intricate detailing, butterfly rangoli designs bring a sense of elegance and beauty to any setting. They are versatile and can be adapted to fit different occasions, from daily decoration to festive celebrations, making them a popular choice among rangoli enthusiasts.
FAQ
What materials do I need to create a butterfly rangoli?
You’ll need colored rangoli powders, a pencil or chalk, a small spoon or applicator, and optionally, a stencil or cardboard template.
How can I make the butterfly wings look symmetrical?
Use a stencil, fold a paper template, or draw a central vertical line and mirror one wing on the other side.
What are some common mistakes to avoid when making a butterfly rangoli?
Avoid not cleaning the surface, using too much powder at once, and forgetting to outline the design for better definition.
How can I add more intricate details to my butterfly rangoli?
Use a thin stick or toothpick for fine lines, experiment with textures like glitter, and layer colors for a gradient effect.
What are some tips for beginners making their first butterfly rangoli?
Start with a simple design, practice beforehand, watch tutorials for techniques, and be patient, taking your time to ensure precision.


2 thoughts on “10 easy steps to draw Butterfly Rangoli”