


Daisies Drawing : Drawing daisies can be a fun and relaxing artistic endeavor, whether you’re a beginner or an experienced artist looking to capture the charm of these cheerful flowers.
Follow these ten simple steps to create your own daisy drawing, and enjoy the process of bringing nature’s beauty to life on paper.
Step 1: Gather Your Supplies for Daisies Drawing
Before you begin, gather your drawing materials: paper, a pencil, an eraser, and optionally colored pencils or markers for adding color later. Choose a comfortable and well-lit workspace to work in.
Also Read : 10 easy steps to draw Daffodils Drawing
Step 2: Draw the Center Circle
Start by drawing a small circle in the center of your paper. This will be the center of your daisy.
Step 3: Sketch the Petals
Around the center circle, lightly sketch the outline of the petals. Daisies typically have about 8-12 petals. Make them slightly curved and evenly spaced around the center.
Also Read : 10 easy steps to draw Rose Drawing
Step 4: Outline the Petals
Once you’re satisfied with the placement, darken the outline of each petal. Add a gentle curve to each petal to give them a natural, slightly ruffled appearance.

Step 5: Add Detail to the Center
Inside the center circle, draw tiny short lines radiating outward. These represent the tiny florets that make up the daisy’s center.
Also Read : 10 easy steps to draw Mouse Drawing
Step 6: Draw the Stem and Leaves
Extend a long, slightly curved line downward from the base of the flower for the stem. Add two or three long, narrow leaves on either side of the stem. Daisies have simple, elongated leaves with pointed tips.
Step 7: Refine Your Drawing
Take a moment to review your drawing and refine any areas that need adjustment. Erase any unnecessary guidelines and ensure the lines are clean and smooth.
Also Read : 10 easy steps to draw Cheetah Drawing
Step 8: Add Texture to the Petals
To add realism, draw gentle, curved lines on each petal to represent veins. This gives the petals a delicate texture.
Step 9: Add Color
If you’d like to add color to your daisy drawing, use colored pencils or markers. Daisies are typically white with yellow centers, but you can add shading and highlights to create depth. Green is suitable for the stem and leaves.
Also Read : 10 easy steps to draw Telegram Logo Drawing
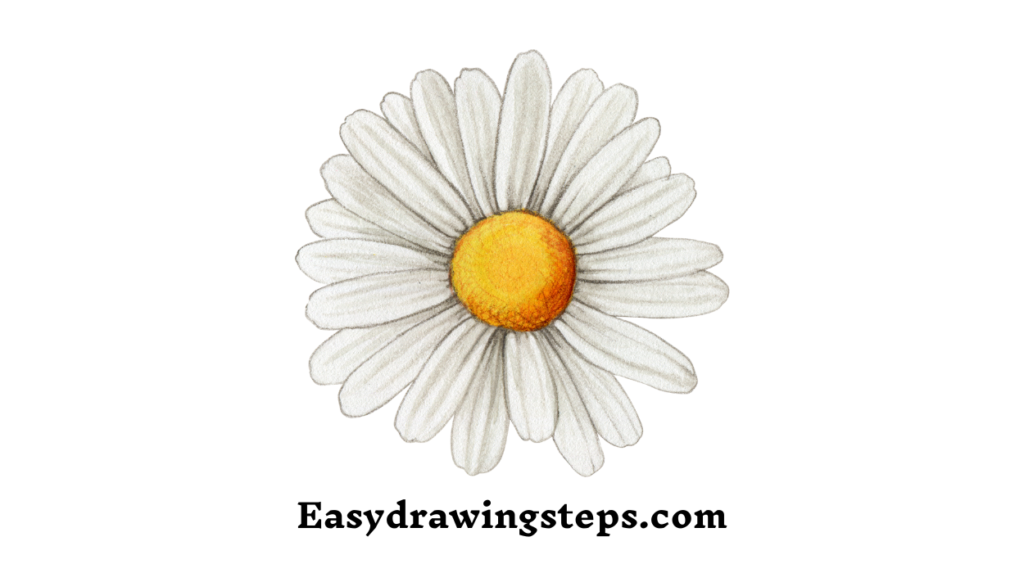
Step 10: Final Touches
Finally, add any final touches to your drawing. Ensure the colors are blended well, and consider adding a background or additional details if desired. Sign your artwork and enjoy your completed daisy drawing!
Exploring Different Daisy Drawing Ideas
- Daisies Drawing Easy: Simplify the steps for beginners by focusing on basic shapes and minimal details.
- Field of Daisies Drawing: Create a charming scene by drawing multiple daisies together, varying their sizes and positions for a natural look.
- Daisies Drawing Simple: Keep your drawing minimalistic with clean lines and a focus on the daisy’s basic structure.
- Bunch of Daisies Drawing: Draw a bunch of daisies tied together with a ribbon or in a vase, perfect for a cheerful floral arrangement.
- Daisies Drawing for Kids: Engage children with simple steps and bright colors, making the drawing process enjoyable and educational.
Drawing daisies allows you to embrace the beauty of nature through art. Whether you’re creating a single flower or an entire field, these steps will guide you towards creating a lovely daisy drawing. Happy drawing!
FAQ
How many petals do daisies typically have, and how should I draw them?
Daisies usually have around 8-12 petals. To draw them, start with a small circle for the center, then sketch each petal as a slightly curved shape radiating outwards from the center circle. Darken the outlines and add gentle curves to mimic the natural ruffled edges of the petals.
What colors should I use for drawing daisies?
Daisies are commonly white with yellow centers. Use white for the petals and yellow for the center. If adding color, consider shading the petals with light gray or adding subtle touches of pink to mimic variations in petal tone.
How can I make my daisy drawing more realistic?
To enhance realism, focus on adding texture and detail. Draw delicate lines on each petal to represent veins. Shade the petals slightly to create depth and add highlights to the edges to make them appear three-dimensional. Pay attention to the center of the daisy by adding tiny dots or short lines for the florets.
Can I draw daisies in different styles?
Absolutely! Daisies can be drawn in various styles, from realistic to abstract. Experiment with different techniques such as stippling (dots), cross-hatching (lines), or even using watercolors for a softer, more artistic approach.
How can I draw a field of daisies?
Drawing a field of daisies involves creating multiple flowers with varying sizes and positions. Start by drawing larger daisies in the foreground with more detail. As you move to the background, draw smaller daisies with less detail to create depth. Vary the angles and spacing between flowers to achieve a natural and organic look.
2 thoughts on “10 easy steps to draw Daisies Drawing”