


Night Scenery Drawing : Drawing a night scenery can be a delightful experience, especially when capturing the serene beauty of a moonlit night.
Follow these ten easy steps to create a stunning night scenery drawing.
Step 1: Gather Your Materials
To start, you’ll need paper, a pencil, eraser, ruler, black pen or marker, and oil pastels. These tools will help you achieve a vibrant and detailed drawing.
Step 2: Sketch the Horizon Line
Begin by drawing a horizontal line across the middle of your paper. This line will represent the horizon and will help you balance the elements in your scenery.
Also Read : 10 easy steps to draw Natural Scenery Drawing
Step 3: Outline the Moon
In the upper part of the sky, draw a large circle to represent the moon. The moon is a key element in night scenery and sets the mood for the entire drawing.

Step 4: Draw the Silhouette of Trees
Below the horizon line, sketch the outline of trees. Use simple, curved lines to form the treetops and trunks. The trees will add depth and contrast to your night scene.
Also Read : 10 easy steps to draw Nature Scenery Drawing
Step 5: Add Stars and Clouds
Fill the sky with small, scattered stars using tiny dots. Add a few wispy clouds around the moon by drawing soft, curvy lines. This will enhance the dreamy quality of the night sky.

Step 6: Define the Landscape
Beneath the trees, draw a simple landscape. This could include rolling hills or a calm lake. Use smooth, flowing lines to keep the scene peaceful and natural.
Also Read : 10 easy steps to draw Scenery Drawing Easy
Step 7: Use Oil Pastels for the Sky
Color the sky using dark blue and black oil pastels. Blend the colors smoothly to create a gradient effect, transitioning from a deep blue near the horizon to almost black at the top of the sky.
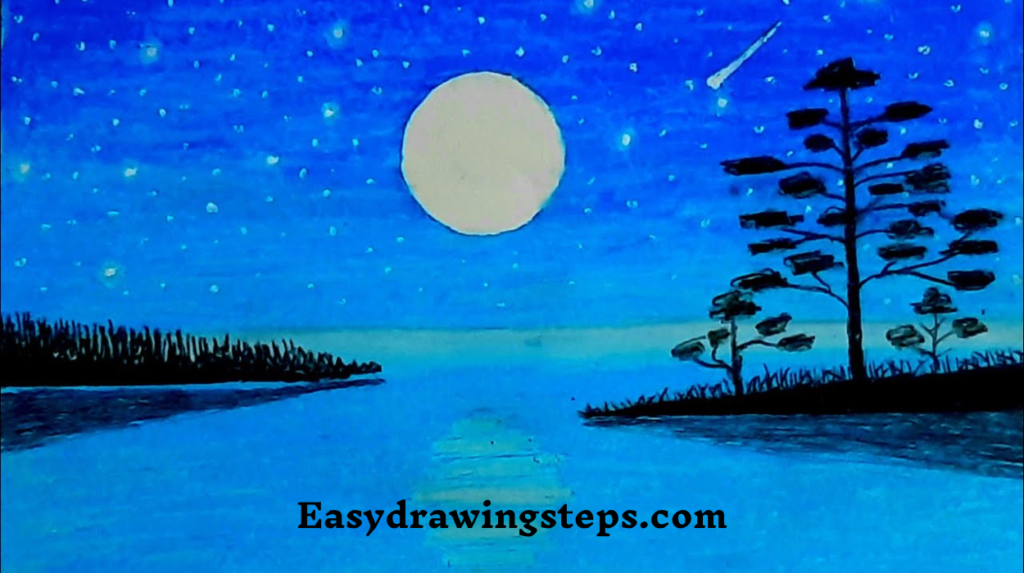
Step 8: Highlight the Moon and Stars
Color the moon with a white or pale yellow pastel, adding a soft glow around it. Highlight the stars with small touches of white to make them stand out against the dark sky.
Also Read : 10 easy steps to draw Beautiful Village Scenery Drawing
Step 9: Shade the Trees and Landscape
Use dark green and brown pastels to shade the trees, creating a silhouette effect. For the landscape, use muted colors to keep the focus on the night sky.
Step 10: Final Touches
Go over the outlines with a black pen or marker to make them more defined. Add any additional details, like reflections on the water if you included a lake, or more stars if you wish.
Other Night Scenery Drawing Ideas
- Beautiful Night Scenery Drawing: This involves capturing the serene and peaceful essence of a night scene, focusing on elements like the moon, stars, and silhouettes of nature.
- Night Scenery Drawing Easy: Simplifying the drawing process into easy-to-follow steps ensures that anyone, regardless of skill level, can create a lovely night scene.
- Moonlight Night Scenery Drawing with Oil Pastels: Using oil pastels adds richness and depth to your drawing, allowing you to blend colors smoothly and achieve a luminous effect for the moon and stars.
- Moonlight Easy Night Scenery Drawing Painting: Combining drawing and painting techniques with oil pastels makes the process accessible and enjoyable, resulting in a beautiful night scene that looks both drawn and painted.
Creating a night scenery drawing can be a rewarding artistic endeavor. By following these steps, you can produce a captivating piece that showcases the tranquil beauty of a moonlit night.
FAQ
What are the essential materials needed for creating a night scenery drawing?
To create a night scenery drawing, you’ll need paper, a pencil, an eraser, a ruler, black pen or marker, and oil pastels. These tools help in outlining, detailing, and coloring the night scene effectively
What are the essential materials needed for creating a night scenery drawing?
To create a night scenery drawing, you’ll need paper, a pencil, an eraser, a ruler, black pen or marker, and oil pastels. These tools help in outlining, detailing, and coloring the night scene effectively.
How can I create a realistic moonlight effect in my night scenery drawing?
To create a realistic moonlight effect, use white or pale yellow oil pastels to color the moon. Add a soft glow around the moon by blending the pastel outward. You can also use a blending tool or your fingers to achieve a smooth transition, giving the moon a luminous appearance.
What techniques can I use to draw stars in a night scenery?
Draw stars by making small, scattered dots in the sky with a white or light-colored pastel or pen. Vary the size of the dots to create a natural look. You can also use a white gel pen for sharper, more defined stars.
How do I add depth and contrast to the trees in my night scenery drawing?
To add depth and contrast to the trees, outline them with a pencil first and then use dark green and brown oil pastels to shade them. Creating a silhouette effect by coloring the trees darker than the background helps them stand out. Adding subtle highlights and shadows enhances the depth.
Can I use watercolors instead of oil pastels for a night scenery drawing?
Yes, you can use watercolors instead of oil pastels. Watercolors can provide a translucent and ethereal quality to the night sky. Start with a light wash of blue for the sky, gradually adding layers of darker blue and black. For the moon and stars, use white watercolor or gouache to add highlights.
1 thought on “10 easy steps to draw Night Scenery Drawing”