

Pencil Nature Scenery Drawing : Drawing nature scenery with a pencil can be a relaxing and rewarding activity. Follow these ten easy steps to create a beautiful pencil nature scenery drawing.
Step 1: Gather Your Materials
You’ll need drawing paper, a set of pencils (ranging from 2H to 6B), an eraser, a sharpener, and a ruler. These tools will help you achieve various shades and details in your drawing.
Step 2: Sketch the Horizon Line
Draw a horizontal line across the middle of your paper to represent the horizon. This line will divide the sky and the land and serve as a reference for placing other elements.
Also Read : 10 easy steps to draw Nature Scenery Drawing
Step 3: Outline the Main Elements
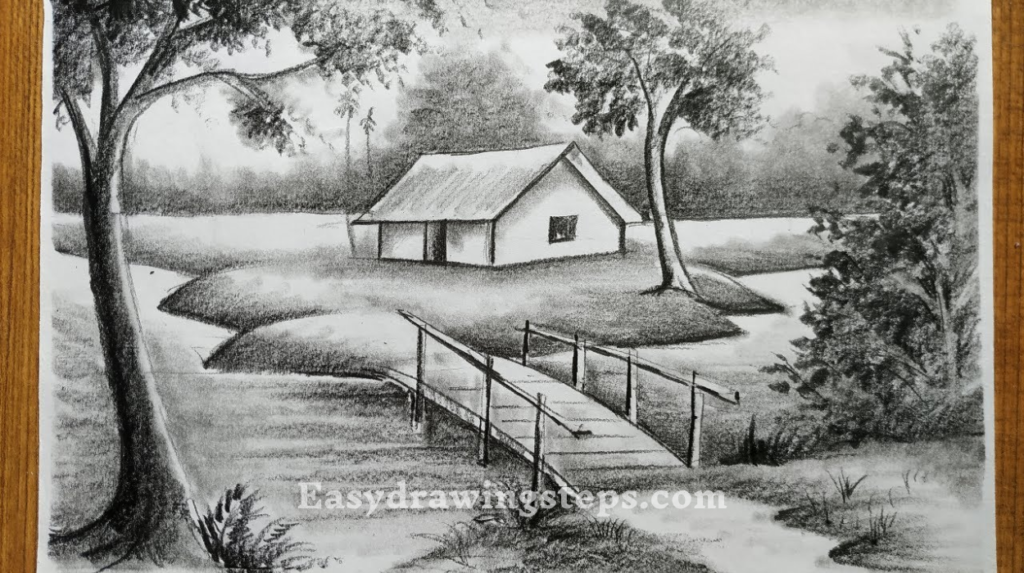
Sketch the main elements of your scenery, such as hills, trees, and a river or path. Use light pencil strokes to outline these features, adjusting the proportions as needed.
Step 4: Add Details to the Foreground
In the foreground, add more detailed elements like rocks, grass, and small plants. These details will help create depth and make your scenery more interesting.
Also Read : 10 easy steps to draw Scenery Drawing Easy
Step 5: Draw the Background
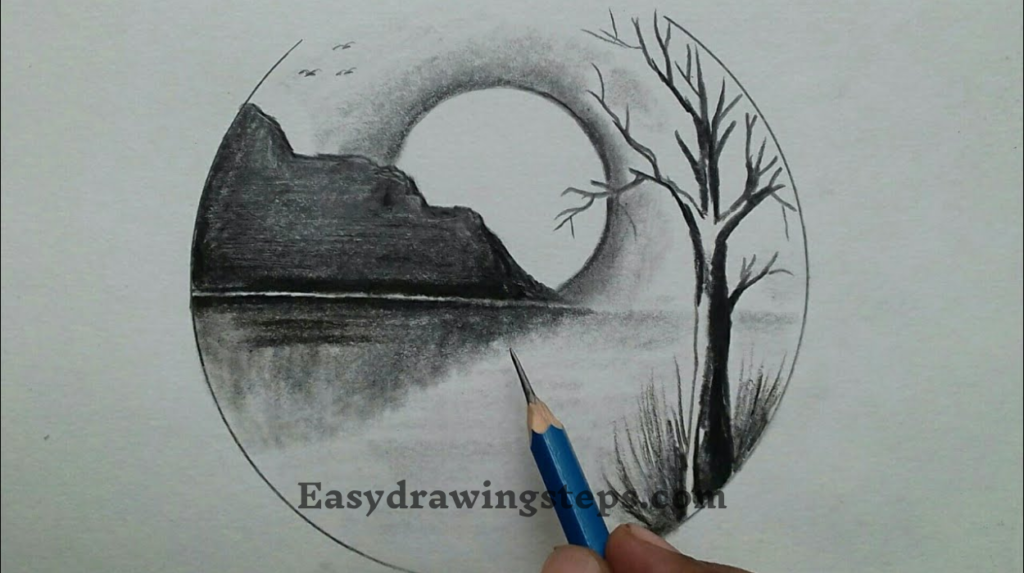
In the background, sketch distant mountains, hills, or trees. Use lighter pencil strokes to create a sense of distance and perspective.
Step 6: Define the Sky
Sketch clouds or a sun in the sky. Use soft, circular motions to draw fluffy clouds and keep the lines light to maintain a natural look.
Also Read : 10 easy steps to draw Beautiful Village Scenery Drawing
Step 7: Add Texture to the Trees
For the trees, draw the trunk and branches with a firmer pencil stroke. Add texture to the leaves by using short, quick strokes. Vary the pressure on the pencil to create different shades and depth.

Step 8: Shade the Landscape
Begin shading the different elements of your landscape. Use a range of pencils to create various shades, starting with lighter pencils (like 2H) for lighter areas and progressing to darker pencils (like 6B) for shadows and depth.
Also Read : 10 easy steps to draw Night Scenery Drawing
Step 9: Blend and Smooth
Use a blending tool or your finger to smooth out the shading and create a more cohesive look. This will help transition between different shades and make the drawing look more polished.
Step 10: Final Touches
Go over the outlines with a firmer pencil to make them more defined. Add any additional details, like texture to the grass or highlights on the water, to enhance the realism of your drawing.
Other Pencil Nature Scenery Drawing Ideas
- Landscape Pencil Nature Scenery Drawing: This involves capturing the broad view of natural landscapes, including elements like mountains, rivers, and forests, using pencil techniques to create depth and texture.
- Village Scenery Pencil Nature Scenery Drawing: Incorporating elements of village life, such as huts, pathways, and rural landscapes, adds charm and context to your nature drawing.
- Beautiful Pencil Nature Scenery Drawing: Focusing on aesthetic appeal, this type of drawing highlights the beauty of nature through detailed textures, balanced compositions, and careful shading.
- Easy Pencil Nature Scenery Drawing: Simplifying the drawing process into manageable steps ensures that even beginners can create lovely nature scenes with confidence.
Creating a pencil nature scenery drawing can be an enjoyable way to connect with nature and improve your artistic skills. By following these steps, you can produce a detailed and beautiful landscape that reflects the serenity and beauty of the natural world.
FAQ
What are the basic materials needed for pencil nature scenery drawing?
To get started with pencil nature scenery drawing, you’ll need basic materials such as various grades of pencils (HB, 2B, 4B, 6B, etc.) to achieve different tones, good quality drawing paper or a sketchbook, a kneaded eraser for gentle corrections and a regular eraser for clean, sharp erasing, a sharpener to keep your pencils in good condition, blending tools like blending stumps or tortillons for smooth shading, and a ruler for straight lines and accurate measurements.
How do you create depth in a pencil nature scenery drawing?
Creating depth in a pencil nature scenery drawing involves several techniques such as overlapping objects to show depth, varying the size of objects with distant objects drawn smaller and closer objects larger, adding more details to closer objects and fewer details to distant ones, using lighter tones for distant objects and darker tones for closer ones, and applying linear perspective principles to show depth, such as converging lines that lead to a vanishing point.
What are some common subjects to include in a nature scenery drawing?
Common subjects in nature scenery drawings include trees of different types and shapes, focusing on leaves and bark texture, mountains with varying shades to show distance and form, water bodies like rivers, lakes, and waterfalls with reflections and ripples, skies with clouds, sun, or moon with varying tones for realism, flora and fauna like grass, flowers, and occasionally animals to add life to the scenery, and optionally, human figures to add a sense of scale and interest.
How can you effectively use shading in pencil nature scenery drawing?
Shading is crucial for adding realism and depth to your drawing. To use shading effectively, determine the direction of the light source to maintain consistent shading, use smooth transitions between light and dark areas, apply hatching and cross-hatching techniques to create texture and depth, use blending tools or fingers to smooth out the pencil strokes for a more natural look, build up layers of shading gradually for a richer tone, and leave areas of the paper white or use an eraser to lift graphite for highlights.
What techniques can beginners use to improve their pencil nature scenery drawing skills?
Beginners can improve their pencil nature scenery drawing skills by observing nature closely and taking note of details, light, and shadow, practicing regularly by sketching different elements of nature, following step-by-step tutorials to learn various techniques and compositions, seeking constructive feedback from others to identify areas for improvement, using reference photos to understand how to depict different scenes and elements accurately, and experimenting with different pencil grades and techniques to see what works best for their style.
4 thoughts on “10 easy steps to draw Pencil Nature Scenery Drawing”