
Pencil Scenery Drawing : Drawing with a pencil allows you to create detailed and expressive scenery with simplicity and precision. Whether you’re a beginner or have some experience, pencil drawing offers a versatile medium to capture the beauty of nature, landscapes, and various scenes.
This guide will take you through 10 easy steps to create a stunning pencil scenery drawing, suitable for all levels.
Step 1: Gather Your Drawing Tools
To start your pencil scenery drawing, gather the necessary tools: a set of pencils with varying hardness (e.g., 2B, 4B, 6B), an eraser, a sharpener, a ruler, and drawing paper. These tools will help you create detailed and shaded drawings with varying tones.
| Tools Needed | Purpose |
|---|---|
| Pencils (2B, 4B, 6B) | For varying line thickness and shading |
| Eraser | To correct mistakes and highlight areas |
| Sharpener | To keep pencils sharp for fine details |
| Ruler | For drawing straight lines and perspective |
| Drawing Paper | Your canvas for the pencil scenery drawing |
Step 2: Start with the Horizon Line
Draw a horizon line across the paper to separate the sky from the land or water. This line is essential in any landscape as it establishes the perspective and placement of other elements. Keep it light, as it might need adjustment later.
Also Read : 10 easy steps to draw Simple Scenery Drawing
Step 3: Sketch Basic Shapes
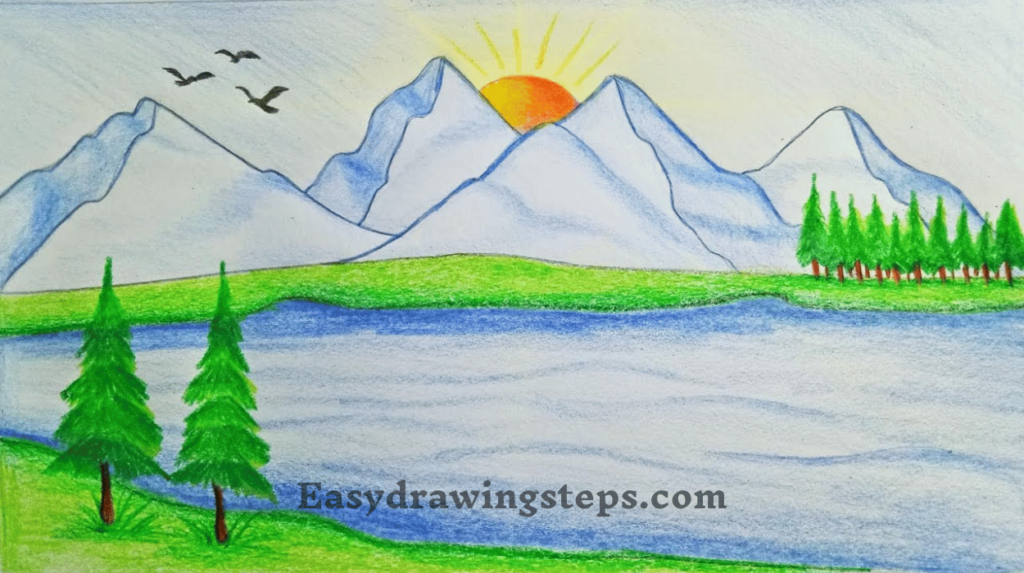
Begin by lightly sketching the basic shapes of your scenery. For instance, if drawing a mountain landscape, start with the outline of the mountains, trees, and a river or path. If you prefer a simpler scene, you might sketch a field with rolling hills or a forest scene with tall trees.

Step 4: Add Details to the Sky
Enhance the sky by adding clouds, the sun, or a few birds. In pencil drawing, the sky can be shaded lightly to create a gradient from dark at the top to light near the horizon, indicating the time of day.
Also Read : 10 easy steps to draw Easy Scenery Drawing
Step 5: Focus on Foreground Elements
Draw the elements in the foreground, such as trees, rocks, or buildings, with more detail. These elements should be darker and more defined than those in the background, as they are closer to the viewer. If you’re drawing a forest, focus on the texture of the tree bark and the leaves.
Step 6: Develop the Background
For the background, sketch mountains, distant trees, or a river flowing through the landscape. These elements should be drawn lightly with less detail to create depth. For a more complex scene, you can add layers of mountains or a far-off cityscape.
| Foreground Elements | Details to Include |
|---|---|
| Trees | Bark texture, leaves, shadows |
| Rocks | Surface texture, cracks, shading |
| Buildings | Windows, doors, rooflines, perspective |
Also Read : 10 easy steps to draw Village Oil Pastel Scenery Drawing
Step 7: Add Texture with Pencil Techniques
Use various pencil techniques like hatching, cross-hatching, stippling, and blending to add texture and depth to your drawing. For instance, you can use hatching to create the rough texture of tree bark or stippling to show the grain of a sandy path.

Step 8: Shade and Blend for Depth
Shading is crucial in pencil scenery drawing to create a three-dimensional effect. Use your pencil to add shadows on the ground, around objects, and in the sky. Blend these areas using a blending stump or your finger to soften the transitions and make the drawing more realistic.
Also Read : 10 easy steps to draw Water Cycle Drawing
Step 9: Highlight and Refine Details
With an eraser, you can add highlights to areas where light hits directly, such as the tops of trees, edges of rocks, or reflections in water. This step enhances the contrast in your drawing and makes certain elements stand out.
Step 10: Final Touches and Review
Review your drawing for any areas that need more detail or correction. Add any final touches, such as enhancing shadows or adding small details like grass, leaves, or ripples in the water. Once satisfied, your pencil scenery drawing is complete and ready to be admired!
Pencil Scenery Drawing FAQ
Why is the horizon line important in a pencil scenery drawing?
The horizon line is crucial in a pencil scenery drawing because it establishes the perspective and separates the sky from the land or water. This line helps in correctly placing other elements in the scene and ensures that the drawing has a realistic and balanced composition.
How can shading techniques improve a pencil scenery drawing?
Shading techniques, such as hatching, cross-hatching, and blending, can significantly improve a pencil scenery drawing by adding depth, texture, and a three-dimensional effect. These techniques help differentiate between light and shadow, making the drawing more realistic and visually appealing.
What tools are necessary for creating detailed pencil scenery drawings?
To create detailed pencil scenery drawings, you need a variety of pencils with different hardness (such as 2B, 4B, and 6B) for varied line thickness and shading. An eraser is essential for correcting mistakes and adding highlights, while a sharpener keeps your pencils sharp for intricate details. A ruler helps with straight lines and perspective, and quality drawing paper serves as the canvas.
What elements should be more detailed in a pencil scenery drawing, and why?
In a pencil scenery drawing, foreground elements like trees, rocks, and buildings should be more detailed because they are closer to the viewer. More detail in these areas creates a sense of depth and realism, making the drawing more engaging and lifelike.
How can highlights enhance a pencil scenery drawing?
Highlights, created using an eraser, can enhance a pencil scenery drawing by adding contrast and bringing certain elements to the forefront. By highlighting areas where light naturally hits, such as the tops of trees, edges of rocks, or reflections in water, the drawing gains depth and a more realistic appearance.
1 thought on “10 easy steps to draw Pencil Scenery Drawing”