

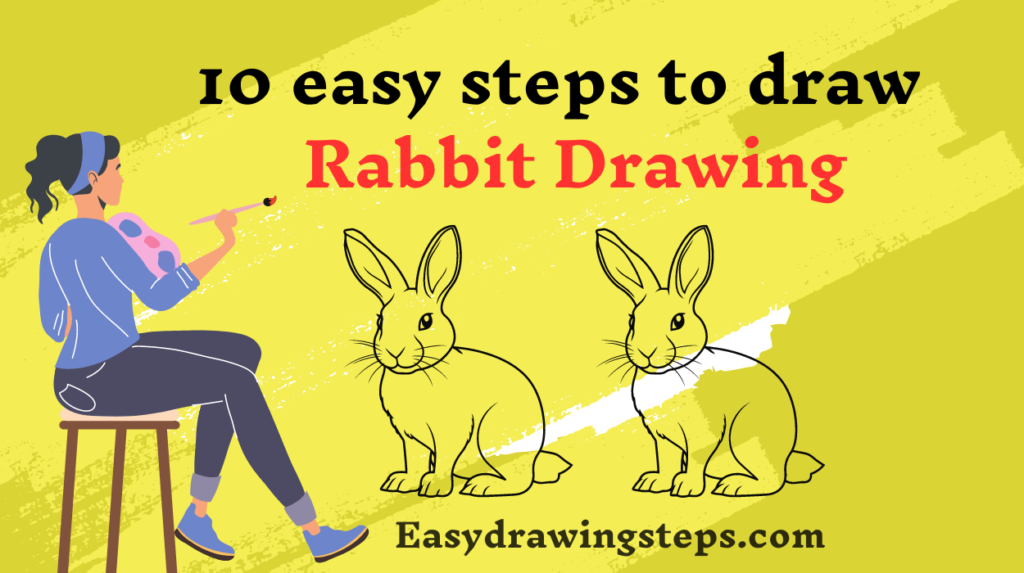
Rabbit Drawing : Drawing a rabbit can be a delightful experience for both kids and adults.
Whether you’re a beginner or looking to guide a young artist, these 10 easy steps will help you create a cute and simple rabbit drawing.
Step 1: Draw the Head of Rabbit Drawing
Start with an oval shape for the rabbit’s head. Make sure it’s slightly tilted to give your rabbit a lively look.
Also Read : 10 easy steps to draw House Drawing
Step 2: Add the Body
Attach a larger oval below the head for the body. This will form the base structure of your rabbit.
Step 3: Sketch the Ears
Draw two long, narrow ovals on top of the head for the ears. The ears can be slightly bent or standing upright.
Also Read : 10 easy steps to draw Diwali Drawing
Step 4: Draw the Eyes
Add two small circles on the head for the eyes. Leave a tiny white spot in each eye to make them look shiny and lively.
Step 5: Create the Nose and Mouth
Draw a small triangle for the nose and add a curved line below it to form the mouth. You can add two small curves on each side for the cheeks.
Also Read : 10 easy steps to draw Bird Drawing
Step 6: Add the Front Legs
Draw two small, elongated ovals in front of the body for the front legs. They should be positioned near the bottom of the head.
Step 7: Sketch the Back Legs
Draw two larger ovals at the back of the body for the hind legs. Make sure they are positioned correctly to give your rabbit a balanced look.
Also Read : 10 easy steps to draw Pokemon Drawing
Step 8: Draw the Tail
Add a small, fluffy circle at the back of the body for the tail. This completes the basic outline of your rabbit.
Step 9: Add Details
Enhance your drawing by adding details like fur lines, whiskers, and inner ear lines. These small touches will make your rabbit look more realistic and cute.
Also Read : 10 Easy Steps to Draw Rainbow Drawing
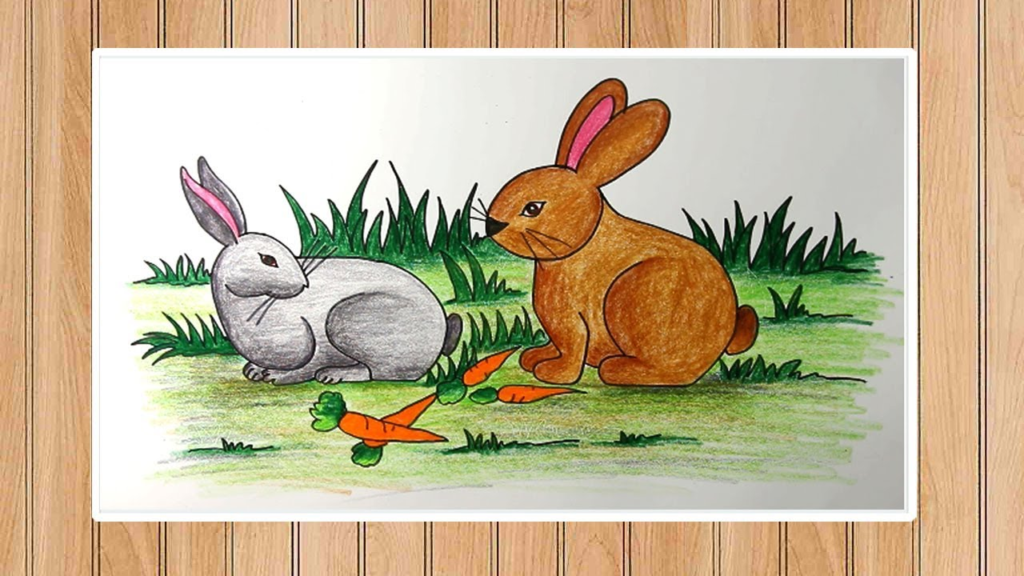
Step 10: Color Your Rabbit
Finally, color your rabbit drawing. You can use soft browns, grays, or even white. Don’t forget to color the inner ears pink and add a bit of shading to give your rabbit a three-dimensional look.
- Rabbit Drawing for Kids: This tutorial is designed to be simple and easy to follow, making it perfect for kids who are learning to draw. The steps are straightforward, and the shapes are easy to replicate.
- Cute Rabbit Drawing: By focusing on features like big, shiny eyes and a fluffy tail, this guide helps you create an adorable and cute rabbit drawing that appeals to everyone.
- Rabbit Drawing Easy: The step-by-step approach ensures that even beginners can follow along without feeling overwhelmed. Each step builds on the previous one, making it easy to draw a rabbit.
- Rabbit Drawing Color: Adding color to your rabbit drawing can make it come to life. This step encourages creativity and helps you practice coloring techniques, whether you use crayons, markers, or colored pencils.
- Easy Rabbit Drawing: This guide simplifies the process of drawing a rabbit into easy-to-follow steps, ensuring that anyone can create a charming rabbit without any difficulty.
By following these steps and understanding the keywords, you can create a delightful rabbit drawing that is not only easy but also fun and rewarding.
Whether you are drawing with kids or exploring your own artistic abilities, this guide will help you create a wonderful piece of art.
FAQ
What basic shapes are used to start a rabbit drawing?
To start a rabbit drawing, you typically use basic shapes like ovals and circles. An oval is used for the head, a larger oval for the body, and smaller circles for the eyes and tail. These basic shapes help create the initial structure of the rabbit, making it easier to add details later.
How can you make a rabbit drawing look cute?
To make a rabbit drawing look cute, focus on features such as big, shiny eyes, a small nose, and a round, fluffy tail. Adding details like rosy cheeks, soft fur lines, and a gentle smile can also enhance the cuteness. Positioning the ears to be slightly bent or floppy adds an adorable touch as well.
What are some tips for drawing rabbit fur?
When drawing rabbit fur, use short, quick strokes to mimic the texture of fur. Vary the length and direction of the strokes to make the fur look natural and soft. For shading, add more strokes in areas where the fur would naturally be darker, such as under the belly and around the legs.
How can you incorporate color into your rabbit drawing effectively?
To incorporate color into your rabbit drawing, start by choosing a base color such as brown, gray, or white. Use lighter shades for areas that catch light, and slightly darker shades for shadows. Adding a touch of pink inside the ears and on the nose enhances the realism. Blend colors smoothly to avoid harsh lines and achieve a natural look.
What are some common mistakes to avoid when drawing a rabbit?
Common mistakes to avoid when drawing a rabbit include making the body proportions incorrect, such as a head that’s too large or legs that are too short. Another mistake is not aligning the ears properly, which can make the rabbit look unbalanced. Additionally, avoid drawing fur with long, straight lines; instead, use short, varied strokes to create a realistic texture. Finally, pay attention to the positioning of the eyes and nose to ensure they are symmetrically placed on the face.
Quality content is the secret to invite the visitors to pay a quick visit the web site, that’s
what this web site is providing. https://www.waste-Ndc.pro/community/profile/tressa79906983/
Quality clntent is tthe secret to invite the visitors to
pay a quick visit the web site, that’s what this web site is providing. https://www.waste-Ndc.pro/community/profile/tressa79906983/
Unquestionably believe that which you stated.
Your favorite justification seemed to bee on the internet the simplest
factor too take note of. I say to you, I certainly get irked while people
consider concerns that they plainly don’t know about.
You managed to hitt the nail upon thee top as well
as defined out the entire thing without having side effect , people can take a
signal. Will likwly be back to gget more. Thank you https://www.horseracingnation.com/user/Aviatorapp
Unquestionably believe that wwhich you stated.
Your favorite justification seemed to be on the internet
the simplest factor to take note of. I say to you, I certainly
get irked while people consider concerns that they plainly don’t know
about. You managed to hit the nail upon the top as well as defined out the
entire thing without having side effect , peoople can take a signal.
Will likely be back to get more. Thank you https://www.horseracingnation.com/user/Aviatorapp
I just like thee valuable info you supply to your articles.
I will bookmar your weblog andd check again right here regularly.
I’m somewhat sure I’ll be told a lot of new stuff proper right here!
Best of luck for the next! https://gamebanana.com/members/3441244
I just like the valuable info you supply to your
articles. Iwill bookmark your weblog and check again right here
regularly. I’m somewhat sure I’ll be told a lot of new stuff
proper right here! Best of luck for the next! https://gamebanana.com/members/3441244
Paragraph writing is also a fun, iff you be familiar with
after thst you ccan write if not itt is complex to write. https://www.flickr.com/people/199971961@N07/
Paragraph writing is also a fun, if you be familiar with after that you can write if not it
is complex to write. https://www.flickr.com/people/199971961@N07/
Write more, tthats aall I have to say. Literally, it seems as though
you relied on the video to make your point. You definitely
know what youre talking about, why waste your intelligence on jusdt posting videos to your
weblog when you could be giving us something enlightening to read? https://vocal.media/authors/mariana-dias-fd1ec0i7y
Wrie more, thats all I have too say. Literally, it seems as though you relied on the video to make your point.
You definitely know what youre talking about, why waste your intelligence
on jut posting videos to your weblog when you could be giving us something enlightening to read? https://vocal.media/authors/mariana-dias-fd1ec0i7y
Normally I do nott read post on blogs, but I wish too say that this write-up vewry pressured me to chneck out and do so!
Your writing style has been amazed me. Thanks, quite great post. https://www.halaltrip.com/user/profile/157048/aviatorgametips/
Normally I do not read post on blogs, but I wish to say that this write-up very
pressured me to check out and do so! Your writing style
hhas been amazed me. Thanks, quite great post. https://www.halaltrip.com/user/profile/157048/aviatorgametips/
I do not even understabd how I ended up right here, howeverr I believed this puut up was
once great. I do not recognise who you’re however certainly you are going
to a famous bogger should you aren’t already. Cheers! https://vocal.media/authors/westerncapebirding
I’m curious to find out what blog ststem you are working with?
I’m having some small security issues with my latest website and
I’d like to find sometyhing mor safe. Do you have aany suggestions? https://www.halaltrip.com/user/profile/154866/aviatorgamess/
I’m curious to find out what blog system you are working with?
I’m having sme small security issues with my latest website
and I’d like to find omething more safe. Do you have any
suggestions? https://www.halaltrip.com/user/profile/154866/aviatorgamess/
For most up-to-date information you have to pay a visit world wide web and
oon the web I found this web site ass a fineest
web site forr most recent updates. https://www.mindmeister.com/app/map/3129595783?t=GbeWqD4aRo
For most up-to-dateinformation youu have to pay a
visit world wide web and on the web I found this web site as a
finest web site for moat recent updates. https://www.mindmeister.com/app/map/3129595783?t=GbeWqD4aRo
What’s up, just wanted to tell you, I loved this post.
It was funny. Keep on posting! https://vocal.media/authors/mariana-dias-fd1ec0i7y
What’s up, just wanted to tell you, I loved this post. It was funny.
Keep on posting! https://vocal.media/authors/mariana-dias-fd1ec0i7y
Hi! Do you know if they make any plugins to protect against hackers?
I’m kinda paranoid about losing everything I’ve worked hard on. Any suggestions? https://matriarchmeadery.com/the-best-way-to-introduce-yourself-in-an-email/
Hi! Do you know if they make any plugins
tto protect againzt hackers? I’m kinda paranoid about losing
everything I’ve workerd hard on. Any suggestions? https://matriarchmeadery.com/the-best-way-to-introduce-yourself-in-an-email/
Unquestionably bdlieve that whuch you said. Your favorite reason appeared to be on the
web the easiest thing to be aware of. I say to you, I
definitely get irked while people think about worries that
they just do not kknow about. You managed to hit the nail upon thhe top
and defined out thee whole thing without having side-effects , people can take
a signal. Will likely be back to gget more.
Thanks https://forum.pgbu.ir/viewtopic.php?id=596
Unquestionably believe that whjich you said.
Your favorite reason appeared to be on the web the easiest thing to
be aware of. I say to you, I definitely get irked while people think about
worries that they just do not know about. You managed to hit the nail upon the top and defined out the wholoe thing without having side-effects , people can take a signal.
Will likely be back to get more. Thanks https://forum.pgbu.ir/viewtopic.php?id=596
Keep on working, great job! https://worldaid.eu.org/discussion/profile.php?id=63978
Its like you learn my thoughts! You apperar to understand so mych
about this, such as you wrote the book in it or something.
I think that you can do with a few p.c. to drive the message house
a bit, but instead of that, this is great blog. An excellent read.
I will certainnly be back. http://fridayad.in/user/profile/2610674
Its like you learn my thoughts! You appear to understand so much about this,
such as you wrote the book in it or something.
I think that you can do with a few p.c. to drive the
message house a bit, but instead off that, this is grat blog.
An excellent read. I will certainly be back. http://fridayad.in/user/profile/2610674
Thank you for every other informative website.
Where else could I am getting that type of info wrjtten in such an ideal approach?
I’ve a venture that I am simply now working on, and I have
been on the look out ffor such info. https://www.backloggd.com/u/casyycloud/
Thank you for every other informative website. Where
else could I aam getting that type of info written in such
an ideal approach? I’ve a venture that I am simply now working on, and I have been on the look out for
uch info. https://www.backloggd.com/u/casyycloud/
Thank you for the good writeup. It actually used to be a entertainment account it.
Glance complex to far brought agreeable from you! However,
how can we kep up a correspondence? https://e-academy.navttc.gov.pk/blog/index.php?entryid=94451
Thank you for the good writeup. It actually used to be a entertainment account
it. Glance complex to faar brought agreeable from you!
However, how can we keep up a correspondence? https://e-academy.navttc.gov.pk/blog/index.php?entryid=94451
Hello! I’m at work surfing around your blog from my new iphone 4!
Just wantedd to say I love reading through your blog annd look forward to all your posts!
Keep up the fantastic work! https://www.pitstopodium.com/f1-news/learn-how-to-introduce-yourself-in-conversation-and-in-writing/
This piece of writing offers clear idea in support of the
new users of blogging, that truly how too do blogging. https://www.pitstopodium.com/f1-news/how-to-introduce-yourself-highlighting-your-relevant-background-and-experience-2/
Hello! I’m at work surfing around your blog from my new
iphone 4! Just wanted to say I lov reading through your blog and look forward to all
your posts!Keep up the fantastic work! https://www.pitstopodium.com/f1-news/learn-how-to-introduce-yourself-in-conversation-and-in-writing/
This piece of writing offers clear idea in support of the new users oof blogging, that
truly how to do blogging. https://www.pitstopodium.com/f1-news/how-to-introduce-yourself-highlighting-your-relevant-background-and-experience-2/
Hello there, just became aware of your blog through Google,
and found that it is trulyy informative. I’m going to
watch out for brussels. I will bee grateful if you continue
this in future. Lots of people will be benefited fropm your writing.
Cheers! https://tigaedu.com/blog/index.php?entryid=303329
Hello there, just became aware of your blog through Google, and found that it is
truly informative. I’m going to watch out for brussels.
I will be grateful if you continue this in future. Lots of
people wioll be benefited from your writing. Cheers! https://tigaedu.com/blog/index.php?entryid=303329
I every time spent myy half an hour to read this web site’s articles or
revirws eeveryday along with a cup of coffee. https://e-academy.navttc.gov.pk/blog/index.php?entryid=94478
I every time spent my half an hour to rea this web site’s articles or revciews everyday along with a cup of coffee. https://e-academy.navttc.gov.pk/blog/index.php?entryid=94478
What’s up, after reading this awesome paragraph i am
as well cheerful to share my know-how here with friends. https://syg-us.com/entrenamiento-virtual/blog/index.php?entryid=37672
What’s up, after reading this awesome partagraph i am as well
cheerful to share my know-how here with friends. https://syg-us.com/entrenamiento-virtual/blog/index.php?entryid=37672
Thanks for the marvelous posting! Iquite enjoyed rreading it,
you might be a great author. I will be sure to bookmak
yyour blog and may come back at some point. I want to encourage one to continue your great posts,
have a nice day! https://caramellaapp.com/milanmu1/BrGMicpnn/iceland-casinos
Thanks for the marvelous posting! I quite enjoyed readingg it, you might
be a great author. I will be sute to bookmark your blog and may come back at some point.
I want to encourage one tto continue your great
posts, have a nice day! https://caramellaapp.com/milanmu1/BrGMicpnn/iceland-casinos