


Rainbow Drawing : Drawing a rainbow is a fun and creative activity that can be enjoyed by kids and adults alike.
Whether you’re looking to create a cute rainbow drawing for kids or a beautiful rainbow drawing with colors, these 10 easy steps will guide you through the process.
Let’s get started on this colorful journey!
Step 1: Gather Your Materials for Rainbow drawing
Before you begin, make sure you have the following materials:
- White drawing paper
- A set of colored markers, crayons, or pencils (red, orange, yellow, green, blue, indigo, violet)
- A pencil and eraser
- A black marker or pen for outlining
Also Read : 10 easy steps to draw Mickey Mouse Drawing
Step 2: Draw the Horizon Line
Start by drawing a horizontal line near the bottom of your paper. This will be the horizon line where your rainbow will sit. It doesn’t have to be perfectly straight; a slightly curved line can add a whimsical touch.
Step 3: Sketch the Arch
Using your pencil, lightly sketch a large arch above the horizon line. This arch will be the base of your rainbow. Make sure it spans most of the width of your paper to give you plenty of room for all the colors.
Also Read : 10 easy steps to draw Itachi Drawing
Step 4: Add More Arches
Inside the large arch, draw six more arches, each slightly smaller than the previous one. These arches will represent the different colors of the rainbow. Make sure they are evenly spaced to keep your rainbow balanced.

Step 5: Start Coloring
Begin coloring the outermost arch with red. Use smooth, even strokes to fill in the arch completely. Remember, the key to a beautiful rainbow drawing with color is to keep your coloring neat and vibrant.
Also Read : 10 easy steps to draw Tiger Drawing
Step 6: Continue with Orange
Move to the next arch and color it with orange. Take your time to stay within the lines and ensure the color is rich and consistent.
Step 7: Add Yellow
Next, color the third arch with yellow. This bright color will start to bring your rainbow to life. Make sure to cover the entire arch without leaving any white spaces.
Also Read : 10 easy steps to draw Pikachu Drawing
Step 8: Green, Blue, and Indigo
Proceed by coloring the fourth arch with green, the fifth with blue, and the sixth with indigo. Each color should blend seamlessly into the next, creating a beautiful gradient effect.
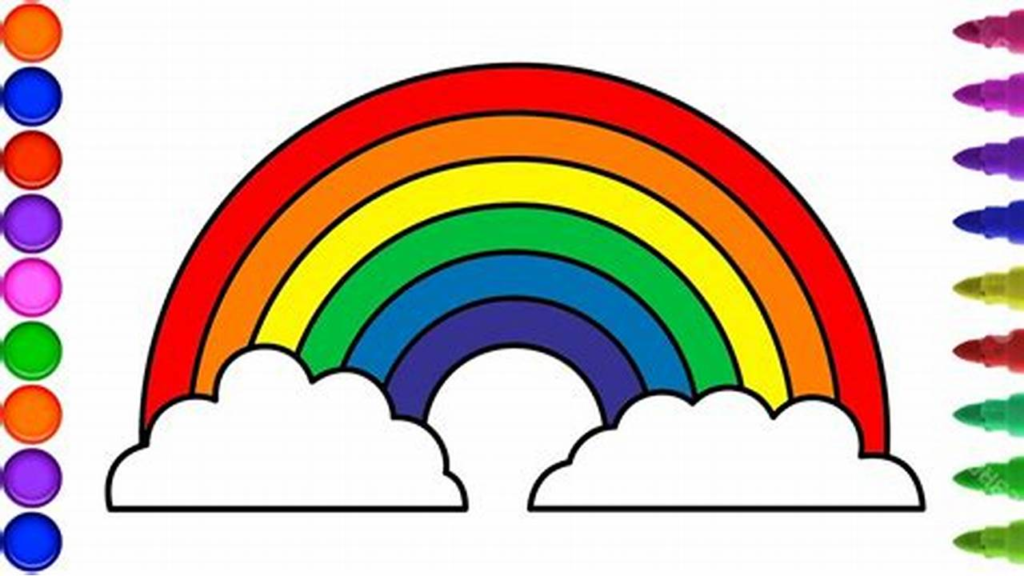
Step 9: Finish with Violet
Finally, color the innermost arch with violet. Your rainbow is now complete with all seven colors shining brightly.
Also Read :10 easy steps to draw Parrot Drawing
Step 10: Outline and Add Details
Once your rainbow is fully colored, use a black marker or pen to outline each arch. This will make the colors pop and give your drawing a finished look. For a cute rainbow drawing for kids, you can add fluffy clouds at the ends of the rainbow, or even draw a smiling sun peeking out.
Bonus Tips for a Beautiful Rainbow Drawing
- If you want to make your rainbow drawing even more beautiful, consider adding a background. You can draw a blue sky, birds, or a landscape below the rainbow.
- Experiment with different art supplies like watercolors or pastels to create different effects.
- Try creating a rainbow with a gradient effect where the colors blend into each other more naturally.
Creating a rainbow drawing is a delightful and easy project that brings joy and color to any art collection.
By following these 10 easy steps, you can create a stunning rainbow that is perfect for kids and adults alike. Whether you aim for a cute, simple drawing or a more detailed and beautiful rainbow drawing with colors, the process is sure to be enjoyable.
So, grab your supplies and let your creativity shine!
FAQ
What materials do I need to draw a rainbow?
You’ll need white drawing paper, colored markers/crayons/pencils (red, orange, yellow, green, blue, indigo, violet), a pencil and eraser, and a black marker for outlining.
How do I ensure the arches of the rainbow are evenly spaced?
Start with a large outer arch, then draw each subsequent smaller arch inside it, maintaining equal spacing. Using a ruler or compass can help with precision.
What are some tips for making a rainbow drawing more beautiful?
Outline with a black marker, add details like clouds or a sun, use smooth coloring strokes, and try different art supplies like watercolors or pastels for unique effects.
Can I use different colors or a different order for my rainbow?
Yes, feel free to get creative! While the traditional order is red, orange, yellow, green, blue, indigo, and violet, you can use any colors and order you like.
How can I make a rainbow drawing more suitable for kids?
Keep it simple with bright, bold colors, add cute elements like smiling clouds or a sun, and encourage kids to use their imagination. Provide step-by-step guidance to make it easy for them to follow along.
3 thoughts on “10 Easy Steps to Draw Rainbow Drawing”