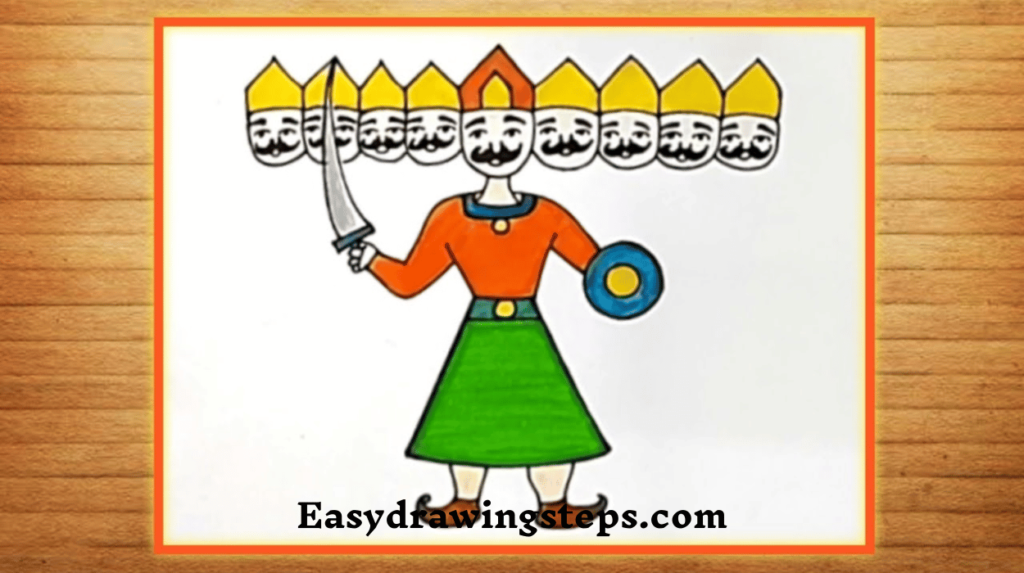
Ravan Drawing : Drawing Ravan, the multi-headed demon king from the epic Ramayana, can be a fun and engaging experience, especially during festive seasons like Dussehra.
Whether you’re a beginner or looking to hone your artistic skills, this guide will take you through ten easy steps to create a captivating Ravan drawing
. Grab your pencils, erasers, and colors, and let’s get started!
Step 1: Gather Your Materials
Before diving in, make sure you have all the necessary materials:
- Sketching pencils (HB, 2B)
- Eraser
- Drawing paper
- Colored pencils or markers
- A ruler (optional)

Step 2: Outline the Head
Begin by lightly sketching an oval shape for Ravan’s head in the center of your paper. This will serve as the base of your drawing. Ensure the oval is slightly wider at the top to accommodate his elaborate hair.
Also Read : 10 Easy Steps to Draw Banana Drawing for Kids
Step 3: Add Facial Features
Next, draw guidelines to help position Ravan’s facial features. Sketch two horizontal lines across the oval—one for the eyes and one for the mouth. Place the eyes on the upper line and the mouth along the lower line.
Step 4: Sketch the Eyes
Draw Ravan’s eyes, giving them a fierce and dramatic look. Use a slanted shape for the upper eyelid, adding a curved line for the lower lid. Don’t forget to add thick eyebrows above the eyes to emphasize his powerful expression.

Step 5: Draw the Nose and Mouth
For the nose, sketch a simple triangular shape in the center of the face, below the eyes. For the mouth, draw a wide grin with sharp, pointed teeth to give him an intimidating look. You can also add a mustache extending from the corners of the mouth for extra flair.
Step 6: Outline the Hair
Ravan is known for his long, flowing hair. Start sketching the hair from the top of the oval, flowing downwards in waves. You can make it as detailed as you like, adding curls and volume to give it a majestic appearance.
Also Read : 10 Easy Steps to Draw Coconut Tree Drawing
Step 7: Add the Crowns
Ravan often wears a crown, so sketch a decorative crown on top of his head. Include intricate patterns, jewels, and spikes to make it stand out. You can add additional crowns if you wish to showcase his multiple heads.
Step 8: Draw the Arms and Torso
Next, sketch the outline of Ravan’s arms and torso. His arms should be muscular, with one raised as if holding a weapon like a sword or bow. Draw the torso with traditional clothing, like a dhoti or armor, with folds to give it a realistic effect.
Also Read : 10 Easy Steps to Draw Ekta Drawing
Step 9: Refine Your Drawing
Go over your drawing, refining the lines and adding details. Erase any unnecessary guidelines and ensure the features are proportionate. You can add accessories like jewelry or patterns on his clothing to enhance the design.
Step 10: Add Color
Finally, bring your drawing to life with colors! Use shades of brown or black for the hair, vibrant colors for the clothing, and gold or yellow for the crown. Adding shadows and highlights will give your drawing depth and dimension.
Congratulations! You’ve successfully drawn Ravan. This step-by-step guide can be adjusted based on your skill level and artistic style. Don’t hesitate to experiment with different colors and expressions to make your drawing unique.
Whether you’re drawing for a school project or to celebrate Dussehra, this creative process can be rewarding and fun. Happy drawing!
Ravan Drawing Coloring Pages
1.

2.

Ravan Drawing FAQ
What materials do I need to start Ravan Drawing?
To start drawing Ravan, you will need sketching pencils (like HB and 2B), an eraser, drawing paper, and colored pencils or markers. A ruler can also be helpful if you want to create straight lines for details.
How can I make Ravan’s facial features look more expressive?
To make Ravan’s facial features more expressive, focus on the shape of the eyes and eyebrows. Using slanted shapes for the eyes and thick, dramatic eyebrows can enhance the fierce expression. Additionally, emphasizing the mouth with a wide grin and sharp teeth will add to his intimidating look.
Can I add my personal touch to the drawing?
Absolutely! While the guide provides basic steps, feel free to add your personal touch. You can experiment with different hairstyles, accessories, or even the clothing design to make Ravan look unique. Adding elements like a background or other characters from the Ramayana can also enhance your artwork.
What colors should I use for Ravan’s drawing?
For Ravan’s drawing, you can use shades of brown or black for the hair, vibrant colors like red or blue for the clothing, and gold or yellow for the crown. Don’t forget to add shadows and highlights to give your drawing depth and make it more visually appealing.
How can I improve my drawing skills while working on this project?
To improve your drawing skills, practice regularly and don’t be afraid to make mistakes. Study reference images of Ravan or other characters for inspiration. You can also take breaks to step back and assess your work, allowing you to see areas that may need refining. Joining drawing classes or online tutorials can also provide valuable tips and techniques.


