


Water Cycle Drawing : Drawing the water cycle is a fun and educational activity that helps kids understand the natural process of water movement on Earth.
Whether it’s for a class project or just a creative afternoon, these ten easy steps will guide you through creating a beautiful and informative water cycle drawing.
This guide is perfect for kids in class 3 and class 4, making learning about the water cycle both easy and enjoyable.
Step 1: Gather Your Supplies
Before you start drawing, make sure you have all the necessary supplies:
- A4 drawing paper
- Pencils
- Erasers
- Colored pencils or crayons
- Markers (optional)
Step 2: Draw the Sun
Start by drawing the sun in the top right corner of your paper. The sun is essential in the water cycle as it provides the energy needed for evaporation. Draw a large circle and add rays around it to represent the sun’s brightness.
Also Read : 10 Easy Steps to Draw a Monitor Drawing
Step 3: Sketch the Ocean
At the bottom of your paper, draw a wavy horizontal line to represent the ocean. The ocean is where most of the evaporation occurs. Make sure to leave some space between the ocean and the sun.

Step 4: Add Evaporation
Draw upward arrows from the ocean to the sky. These arrows represent water vapor rising due to the sun’s heat. You can make the arrows wavy to show the movement of the water vapor.
Also Read : 10 easy steps to draw keyboard drawing
Step 5: Draw the Clouds
In the middle of your paper, above the ocean, draw a few fluffy clouds. The clouds form when the water vapor cools and condenses in the atmosphere. Make sure the clouds look puffy and soft.

Step 6: Illustrate Condensation
Inside the clouds, draw small water droplets. These droplets represent condensation, where water vapor turns back into liquid form within the clouds.
Also Read : 10 easy steps to draw Night Oil Pastel Scenery Drawing
Step 7: Add Precipitation
From the clouds, draw downward arrows to the land and ocean. These arrows represent precipitation, such as rain, snow, or hail. You can add small raindrops or snowflakes along these arrows to make it clear.
Step 8: Show Collection
At the bottom of your drawing, where the arrows hit the land, draw a river or a lake. This represents the collection of water after precipitation. The water collects in rivers, lakes, and oceans, completing the water cycle.
Also Read : 10 easy steps to draw Chandra Dinam Drawing
Step 9: Add Labels
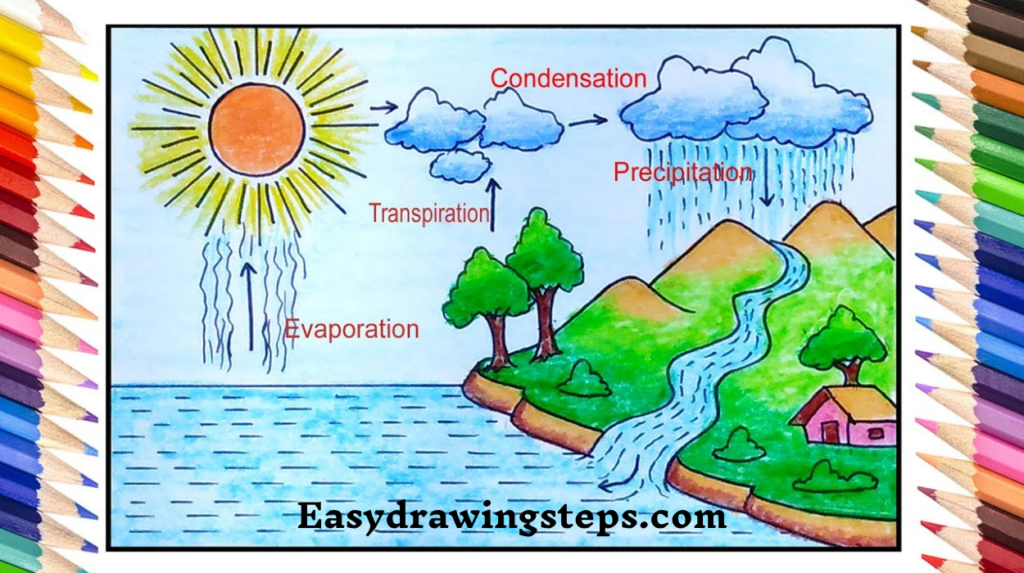
Label each part of your drawing to explain the water cycle stages. Write “Evaporation” next to the arrows going up from the ocean, “Condensation” near the clouds, “Precipitation” along the arrows coming down from the clouds, and “Collection” near the river or lake.
Step 10: Color Your Drawing
Use colored pencils or crayons to bring your drawing to life. Color the sun yellow, the ocean blue, the clouds white, and the arrows in different colors to distinguish each process. Adding color makes the drawing more vibrant and easier to understand.
- Water cycle drawing easy: This phrase emphasizes that the water cycle drawing process is simple and straightforward, making it accessible for kids and beginners.
- Water cycle drawing for class 3: This indicates that the drawing tutorial is suitable for students in class 3, aligning with their educational curriculum and understanding level.
- Water cycle drawing for kids: This emphasizes that the drawing instructions are designed with children in mind, making the process fun and engaging for young learners.
- Water cycle drawing for class 4: Similar to the class 3 mention, this phrase highlights that the tutorial is also appropriate for class 4 students, providing a slightly more detailed approach suitable for their level.
By following these ten easy steps, kids can create a beautiful and informative water cycle drawing that helps them understand the process in a fun and creative way. This activity not only enhances their artistic skills but also reinforces their knowledge of one of nature’s most important cycles.
FAQ
What are the main stages of the water cycle that should be included in a water cycle drawing?
The main stages of the water cycle to include in a drawing are evaporation, condensation, precipitation, and collection. These stages show how water moves from the Earth’s surface to the atmosphere and back again.
Why is the sun an important part of the water cycle drawing?
The sun is crucial because it provides the energy needed for evaporation. It heats up water from oceans, lakes, and rivers, turning it into water vapor that rises into the atmosphere.
How can you visually represent condensation in a water cycle drawing?
Condensation can be represented by drawing clouds with small water droplets inside them. This shows the process where water vapor cools and turns back into liquid form in the atmosphere.
What symbols or shapes can be used to show precipitation in a water cycle drawing?
Precipitation can be shown using downward arrows from clouds to the ground, with raindrops, snowflakes, or hailstones along these arrows to indicate different forms of precipitation
How can you make a water cycle drawing educational and engaging for kids?
To make the drawing educational and engaging, use bright colors, clear labels for each stage, and simple explanations. Including fun elements like a smiling sun or colorful raindrops can also help maintain kids’ interest and make learning enjoyable.
1 thought on “10 easy steps to draw Water Cycle Drawing”