
Zenitsu Drawing : Zenitsu Agatsuma is a beloved character from the popular anime and manga series Demon Slayer: Kimetsu no Yaiba. Known for his distinctive yellow hair and vibrant personality, drawing Zenitsu can be a fun project for fans of the series.
Whether you’re a beginner or an experienced artist, this step-by-step guide will help you create an impressive Zenitsu drawing.
Let’s get started!
Step 1: Gather Your Materials
Before you begin, make sure you have all the necessary materials. You’ll need paper, a pencil, an eraser, and colored pencils or markers for coloring. A ruler might also be helpful for drawing straight lines.

Step 2: Start with Basic Shapes
Begin by sketching the basic shapes that form Zenitsu’s head and body. Draw a circle for the head and a vertical line down the center to help you align the facial features. For the body, use an oval shape for the torso and simple lines for the arms and legs.
Also Read : 10 Easy Steps to Draw Lord Shiva Drawing
Step 3: Outline the Face
Next, refine the shape of the face by adding jawlines and cheekbones. Draw two horizontal lines across the circle to mark the eye level and the location of the mouth. This will help you place the facial features accurately.
Step 4: Draw the Eyes and Eyebrows
Zenitsu’s eyes are large and expressive. Sketch two big oval shapes for the eyes, and add small circles for the pupils. Don’t forget to add the eyebrows above the eyes. Zenitsu’s expression is often one of surprise or fear, so you can make the eyebrows arch upward to convey this emotion.

Step 5: Add the Nose and Mouth
Draw a small, simple nose just below the eyes, following the centerline you created earlier. For the mouth, draw a curved line that captures Zenitsu’s signature expression, whether it’s a smile or a look of determination. You can add some details like teeth if you want.
Step 6: Create the Hair
Zenitsu has spiky, bright yellow hair that is one of his most recognizable features. Start by sketching the hairline around the forehead, then add the spikes, making sure to give it a dynamic look. Remember that his hair is longer at the back and has a layered appearance.
Also Read : 10 Steps to Draw Shiva Drawing Easy
Step 7: Draw the Outfit
Now it’s time to add Zenitsu’s outfit. He typically wears a haori (a traditional Japanese jacket) over his uniform. Sketch the collar and sleeves of the haori, and include any patterns or details that are characteristic of his clothing. Don’t forget to draw the belts and other accessories.
Step 8: Refine the Body and Limbs
Once the clothing is in place, refine the shape of Zenitsu’s body and limbs. Make sure the arms and legs are proportionate and add details like fingers and shoes. Keep the pose dynamic to reflect his energetic personality.
Also Read : 10 Easy Steps to Draw Little Shiva Drawing
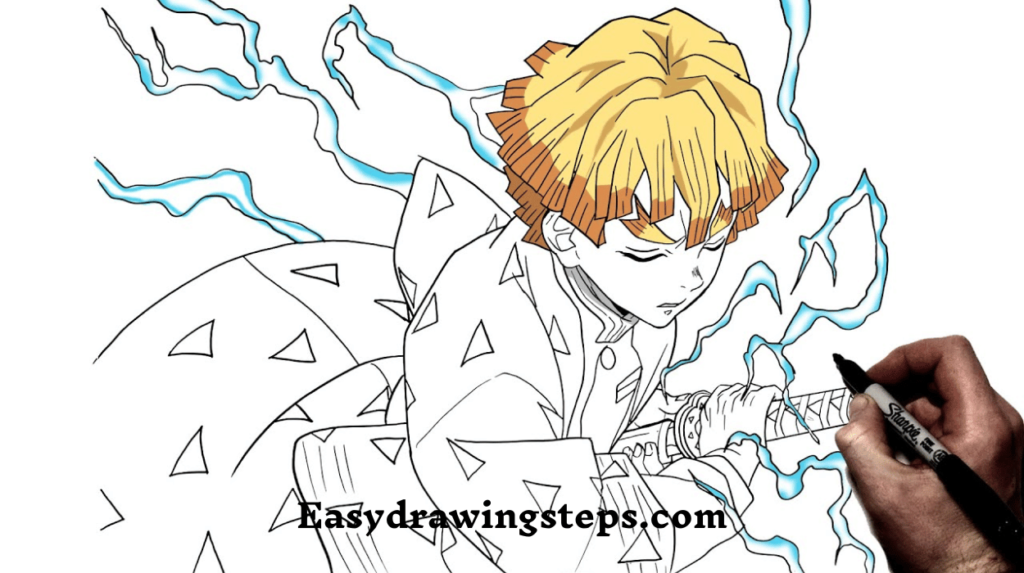
Step 9: Outline Your Drawing
Using a fine-tip pen or a darker pencil, outline your entire drawing to make it stand out. Take your time to ensure that all the details are clear and defined. Once you’ve finished outlining, allow the ink to dry before erasing any pencil marks.
Step 10: Add Color and Shading
Finally, it’s time to bring your drawing to life with color! Use yellow for Zenitsu’s hair, brown for his eyes, and choose vibrant colors for his outfit. You can add shading to give depth to the hair and clothing, making your drawing more dynamic and realistic.
This step-by-step guide is perfect for fans of the series and aspiring artists alike. Remember, practice is key to improving your skills, so don’t hesitate to try Zenitsu Drawing in different poses or styles. Enjoy your artistic journey!
Zenitsu Drawing FAQ
What materials do I need to drawZenitsu Drawing?
To draw Zenitsu, you will need basic materials such as paper, a pencil, an eraser, and colored pencils or markers for coloring. Additionally, using a fine-tip pen for outlining can help give your drawing a polished look.
Is it necessary to follow the steps in order when drawing?
While following the steps in order is helpful for beginners to maintain proportions and details, you can adapt the process based on your comfort level. Feel free to spend more time on specific areas or skip steps that you feel confident in handling.
How can I capture Zenitsu’s emotions in my drawing?
To capture Zenitsu’s emotions, focus on his facial features. Make his eyes larger and more expressive, and adjust the shape of his eyebrows to reflect surprise or determination. The position of his mouth can also convey different emotions, so consider using a smile or a frown based on the mood you want to express.
What if I’m not good at drawing hair?
If you’re struggling with drawing hair, try breaking it down into simpler shapes. Start with basic outlines for the hair and then add spikes or layers gradually. Practice is essential, so don’t hesitate to sketch Zenitsu’s hair multiple times until you feel comfortable with it.
How can I improve my drawing skills after completing this Zenitsu drawing?
To improve your drawing skills, practice regularly and try drawing different characters or styles. Study other artists’ work for inspiration and techniques. Additionally, keep a sketchbook to track your progress, and consider seeking feedback from friends or online art communities to learn and grow.
2 thoughts on “10 Easy Steps to Draw Zenitsu Drawing”