

Pencil Easy Peacock Drawing : Drawing a peacock with pencils can be a delightful and creative experience. The peacock, with its intricate feathers and elegant shape, offers an exciting opportunity to practice shading and detail.
Whether you’re a beginner or looking to refine your skills, these 10 easy steps will guide you through creating a beautiful peacock drawing using pencils.
Step 1: Outline the Basic Shapes
Begin by sketching the basic shapes of the peacock. Draw a small circle for the head and a larger oval for the body. Connect these shapes with a smooth, curved line for the neck. This simple outline serves as the foundation for your drawing, helping you get the proportions right before adding details.

Step 2: Draw the Neck and Head Details
Extend the neck from the body, giving it a graceful curve. Add a small triangle for the beak and two small circles for the eyes. Lightly sketch these details to start, focusing on getting the shape and placement correct. This step sets the stage for the peacock’s distinct features.
Also Read : 10 Steps to Draw Pencil Easy Krishna Drawing
Step 3: Sketch the Body Feathers
Now, start adding the feathers to the body. Use short, curved lines to create the texture of the feathers. Begin from the neck and work your way down to the tail, making sure the feathers overlap slightly for a natural look. This step will give the body of your peacock some texture and dimension.
Step 4: Outline the Tail Feathers
For the tail feathers, draw several long, curved lines extending from the back of the body. These lines should fan out to form the tail’s shape. To add realism, vary the lengths and curves of these lines. The tail feathers are crucial for capturing the peacock’s majestic appearance.
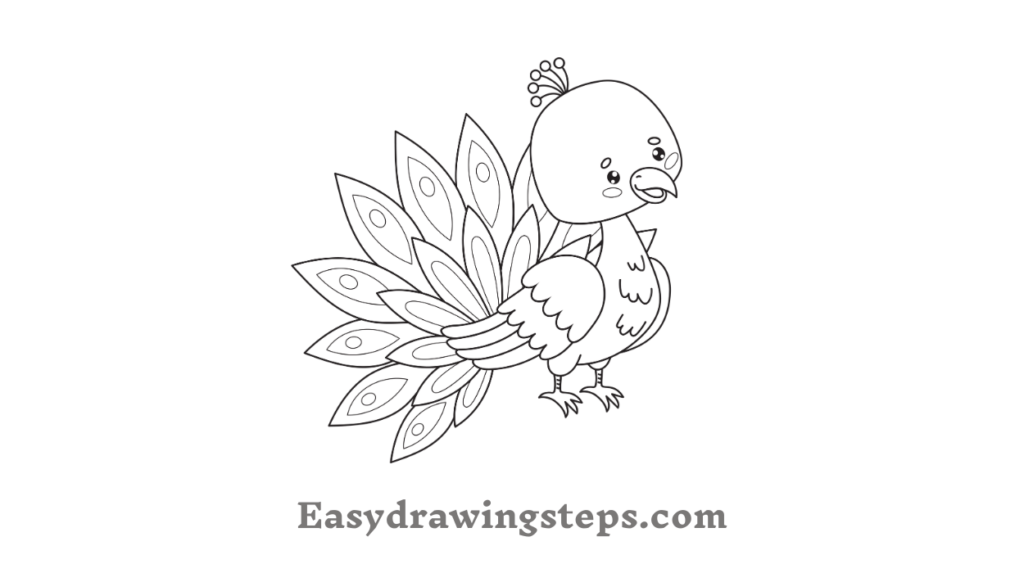
Step 5: Add the “Eye” Patterns on the Tail
To make the tail feathers stand out, add the iconic “eye” patterns. Draw small ovals with a dot in the center along the tail feathers. These patterns are key to giving the peacock its characteristic look. Make sure to space them evenly and adjust their size to fit the feathers.
Step 6: Refine the Feather Details
Go over the feathers with more detailed lines to enhance their texture. Add shading to create depth, particularly where the feathers overlap. Use gentle pencil strokes to simulate the light and dark areas of the feathers. This step adds realism to your pencil drawing.
Also Read : 10 easy steps to draw Easy Scenery Drawing
Step 7: Color the Peacock (Optional)
If you choose to add color, start with light pencil strokes and gradually build up layers. For a color pencil drawing, use shades of blue, green, and gold to fill in the feathers. Blend the colors smoothly to mimic the peacock’s vibrant plumage. This step transforms your pencil sketch into a colorful masterpiece.

Step 8: Draw the Legs and Feet
Sketch the legs extending from the bottom of the body. Draw two straight lines for each leg, slightly bent, and add small, claw-like feet. Position the legs so the peacock looks balanced and natural. This step completes the peacock’s structure.
Also Read : 10 easy steps to draw Simple Scenery Drawing
Step 9: Add a Background (Optional)
To give your peacock drawing more context, you can add a background. A simple scenery drawing, such as a garden or forest, complements the peacock and enhances the overall composition. Use light pencil strokes to create a subtle background that doesn’t overpower the main subject.
Step 10: Final Touches
Finally, review your drawing and add any final touches. Darken the outlines to make them stand out and smooth out any rough areas. If needed, add more shading or color to enhance the drawing’s depth and detail. This step ensures that your peacock drawing looks polished and complete.
Drawing a peacock with pencils is a wonderful way to practice artistic skills while creating a stunning piece of art. By following these 10 easy steps, you can create a beautiful pencil peacock drawing, whether you choose to keep it simple or add color. Embrace the process and enjoy the creativity that comes with bringing this majestic bird to life on paper. Happy drawing!
Pencil Easy Peacock Drawing FAQ
What is the first step in creating a pencil drawing of a peacock?
The first step is to outline the basic shapes of the peacock. Begin by drawing a small circle for the head and a larger oval for the body. Connect these shapes with a curved line for the neck. This simple outline establishes the foundation of your drawing and helps you get the proportions correct before adding details.
How can you make the tail feathers of the peacock look realistic in a pencil drawing?
To make the tail feathers look realistic, draw several long, curved lines extending from the back of the body. These lines should fan out to form the tail’s shape. Add the “eye” patterns by drawing small ovals with dots in the center along the feathers. Use shading to create depth and overlap the feathers slightly to enhance realism.
What techniques can be used to add depth and texture to the peacock’s feathers in a pencil drawing?
To add depth and texture, use varying pencil strokes to create light and dark areas on the feathers. Apply gentle shading where feathers overlap and use a blending tool or your finger to smooth out the transitions between light and dark areas. This technique gives the feathers a more three-dimensional appearance and enhances the overall texture.
How can you incorporate color into a Pencil Easy Peacock Drawing, and what colors are recommended?
If you choose to add color, use colored pencils to gradually build up layers. For a vibrant peacock, use shades of blue, green, and gold. Start with light strokes and blend the colors smoothly to mimic the peacock’s natural plumage. Adding color brings the drawing to life and highlights the peacock’s beauty.
What should you do if you want to add a background to your peacock drawing?
To add a background, sketch a simple scene like a garden or forest using light pencil strokes. Ensure the background complements but doesn’t overshadow the peacock. Use soft shading and minimal details to keep the focus on the peacock while providing context. This step adds depth to the drawing and makes it more complete.
2 thoughts on “10 Steps to Draw Pencil Easy Peacock Drawing”