
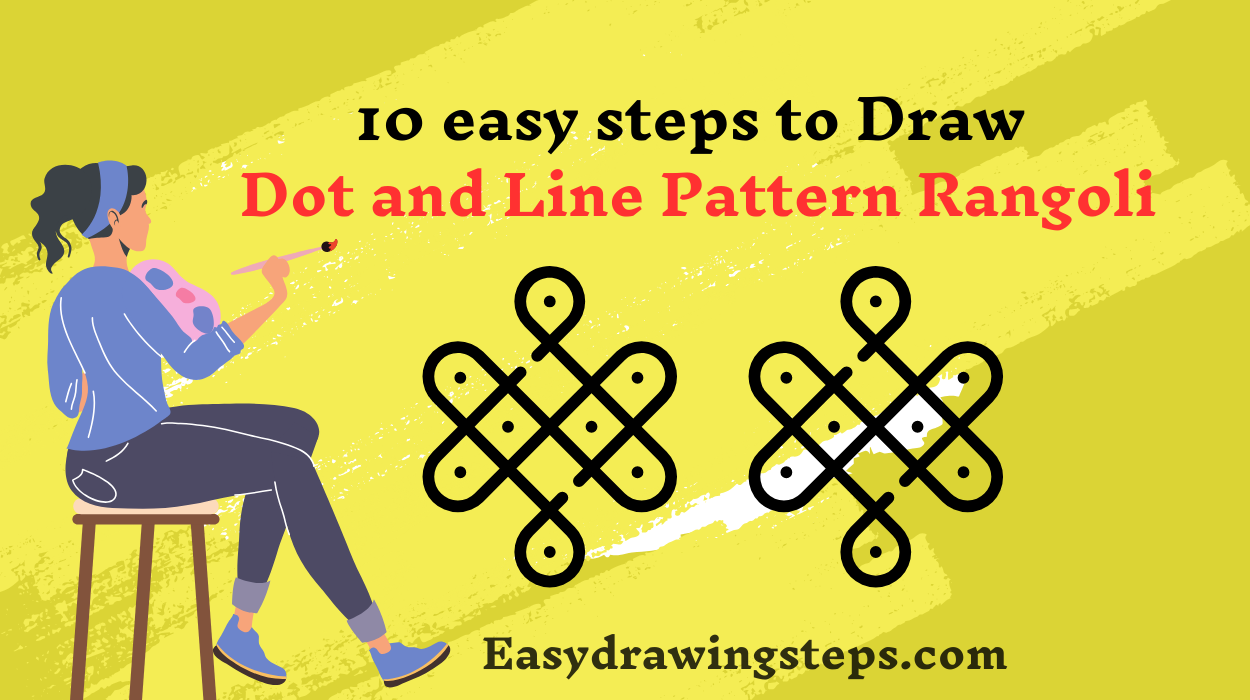

Dot and Line Pattern Rangoli : Creating a dot and line pattern rangoli is a traditional and beautiful way to decorate your home during festivals and special occasions. Follow these 10 easy steps to create a stunning design:
Step 1: Gather Your Materials for Dot and Line Pattern Rangoli
You’ll need:
- Colored rangoli powders
- A pencil or chalk
- A small spoon or rangoli powder applicator
- A ruler (optional for precision)
Also Read : 10 Easy Steps to Draw a Flower Petal Rangoli
Step 2: Prepare the Surface
Clean the area where you will draw your rangoli. A smooth, clean surface is essential for neat and precise designs.
Step 3: Draw a Grid of Dots
Using a pencil or chalk, draw a grid of evenly spaced dots. The size of the grid depends on the complexity of your design. Start with a small grid (e.g., 5×5 or 7×7) if you are a beginner.
Also Read : 10 easy steps to draw Butterfly Rangoli
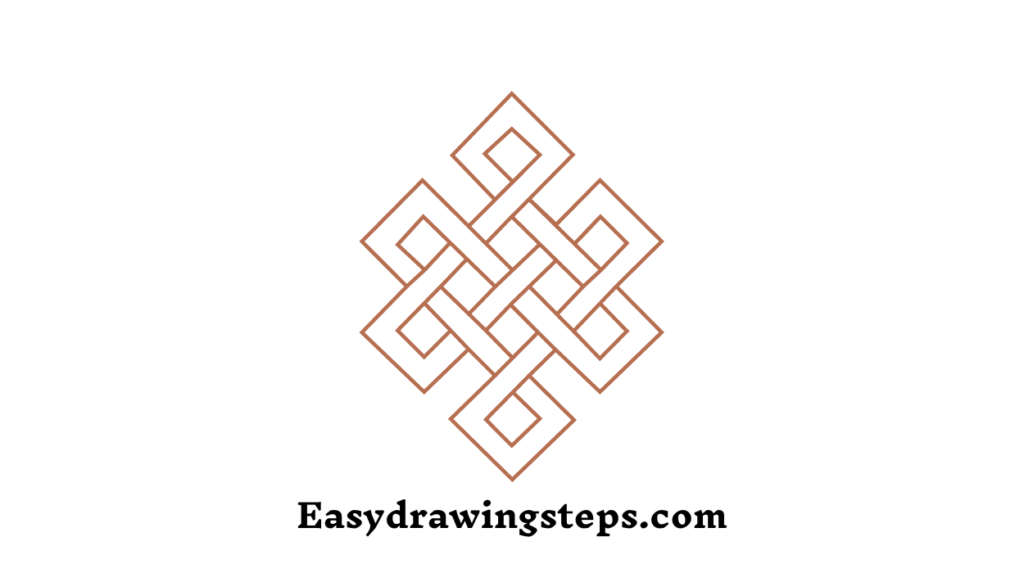
Step 4: Connect the Dots with Lines
Begin connecting the dots with straight lines to form basic shapes such as squares, triangles, or diamonds. This forms the foundation of your pattern.

Step 5: Create Symmetrical Patterns
Ensure symmetry by repeating the same pattern on all sides of the grid. This will help maintain balance and harmony in your design.
Also Read : Top 10 Simple Rangoli Design
Step 6: Add Decorative Elements
Enhance the basic shapes by adding additional lines and patterns. You can draw curves, swirls, and additional dots within the shapes to make the design more intricate.
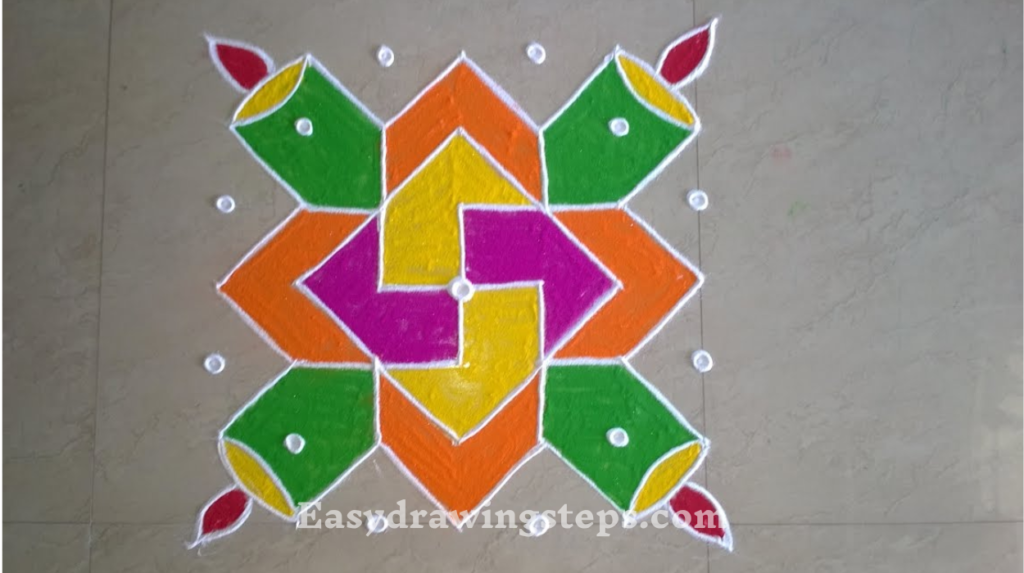
Step 7: Choose Your Colors
Select the colors you want to use. Traditional rangoli often uses bright, contrasting colors to make the design stand out.
Also Read : How to draw rangoli design easy simple
Step 8: Fill the Patterns
Carefully fill the shapes and patterns with colored rangoli powder. Use a small spoon or your fingers to control the powder placement and keep the lines sharp.
Step 9: Outline the Design
Once all shapes are filled, outline the entire design with a dark color to make it pop. This step enhances the definition of the patterns.
Also Read : 10 easy steps to draw G20 Logo Drawing
Step 10: Final Touches
Review your rangoli for any imperfections. Clean up stray powder to ensure neatness. You can also add small details or additional decorative elements around the main design to complete the look.
By following these steps, you’ll be able to create a beautiful dot and line pattern rangoli that adds a festive touch to your home. Happy rangoli making!
7 dots rangoli designs
7 dots Rangoli designs are a popular and simple form of traditional Indian art that can be created by beginners and experts alike. These designs start with a grid of 7×7 dots, where each dot is equidistant from the others. This grid serves as the foundation for a variety of intricate patterns, combining straight lines, curves, and symmetrical shapes to form beautiful and symmetrical motifs.
The simplicity of the 7-dot grid makes it versatile for creating numerous designs such as flowers, peacocks, or geometric shapes. Each design often holds cultural significance, reflecting themes from nature, spirituality, or folklore.
This form of Rangoli is particularly popular during festivals and special occasions, symbolizing prosperity and welcoming guests. The 7 dots Rangoli designs are not only visually appealing but also a wonderful way to preserve and celebrate traditional art and culture.
With practice, one can explore endless possibilities within this format, adding colors and personal touches to enhance the beauty of the designs.
3 dots rangoli designs
Three dots rangoli designs are a simple yet elegant form of traditional Indian art that can be easily created by both beginners and experienced artists.
These designs typically use a grid of three evenly spaced dots, forming the foundation of the pattern. The dots act as reference points for drawing symmetrical lines and curves, resulting in intricate geometric shapes or floral motifs.
The simplicity of the three-dot arrangement allows for a variety of creative possibilities, from basic patterns to more elaborate compositions.
These designs are often used during festivals and celebrations, adding a touch of cultural beauty and vibrancy to homes and public spaces.
Additionally, the minimalistic nature of three dots rangoli makes it an excellent choice for quick decorations, ensuring that even with limited time, one can create stunning and meaningful artwork.
FAQ
What materials do I need to create a dot and line pattern rangoli?
You’ll need colored rangoli powders, a pencil or chalk, a small spoon or applicator, and a ruler (optional).
How can I ensure my dots are evenly spaced?
Use a ruler to measure equal distances, draw a grid lightly with pencil or chalk, and practice on paper first.
What are some common mistakes to avoid when making a dot and line pattern rangoli?
Avoid not cleaning the surface, placing dots unevenly, and applying too much powder at once.
How can I add intricate details to my dot and line pattern rangoli?
Use a thin stick or toothpick for fine lines, combine straight lines with curves, and layer different colors for gradients.
What tips can help beginners create their first dot and line pattern rangoli?
Start with a simple design and small grid, practice on paper, watch tutorials for inspiration, and be patient for precision.
4 thoughts on “10 Easy Steps to Draw a Dot and Line Pattern Rangoli”