
Ganpati Bappa Morya Rangoli : Ganesh Chaturthi is one of the most celebrated festivals in India, and one of the best ways to express devotion to Lord Ganesha is through a vibrant and beautiful rangoli.
Creating a “Ganpati Bappa Morya” rangoli adds a touch of joy and color to your home during the festival.
In this blog, we will guide you through 10 easy steps to create a stunning Ganpati Bappa Morya rangoli design that’s perfect for both beginners and rangoli enthusiasts alike.
Step 1: Gather Your Materials
Before starting your rangoli, gather all the materials you’ll need. For this design, you’ll need:
- Colored rangoli powders (red, orange, yellow, white, green, and blue work best)
- A few stencils (optional but helpful)
- Chalk or white rangoli powder to outline the design
- A small sieve (for smoother lines)
- Ganesh stencil or reference image (optional)

Step 2: Clean the Surface
Begin by cleaning the surface where you want to create the rangoli. Make sure it’s smooth and free from dust, as a clean base ensures that the rangoli colors stick well. You can do this indoors at the entrance or in the courtyard outside.
Step 3: Outline the Ganpati Shape
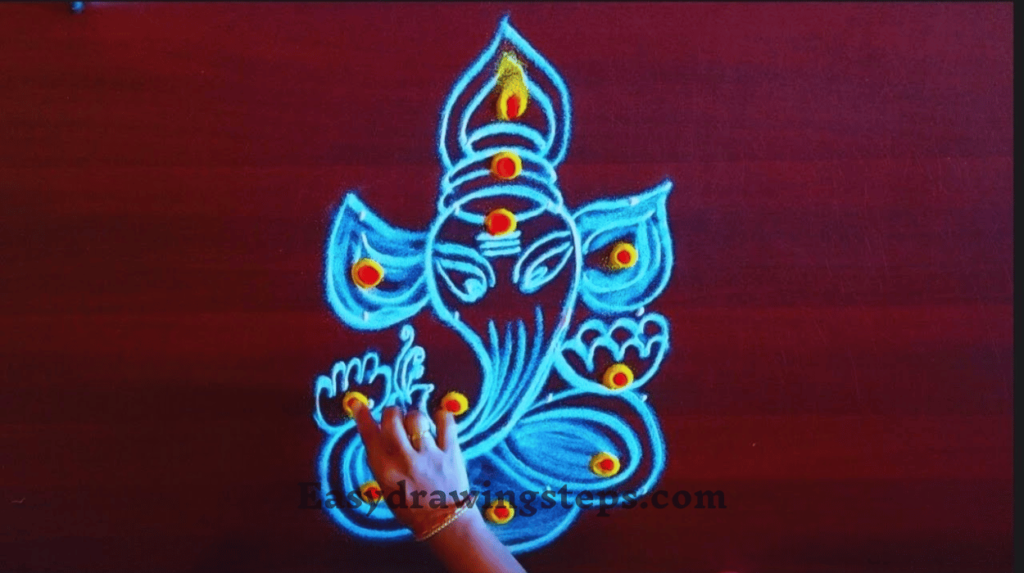
Now, start by sketching an outline of Lord Ganesha’s figure using chalk or white rangoli powder. You can freehand the design or use a Ganpati stencil to ensure accuracy. Focus on creating the iconic elements like the large ears, trunk, and crown, which are symbolic of Lord Ganpati.
Also Read : 10 Easy Steps to Draw Vinayaka Drawing
Step 4: Begin with the Face
Using the white rangoli powder, gently fill in the face of Lord Ganesh. Ensure that the eyes, trunk, and ears are clearly defined. A smooth and even application of the rangoli powder will give your Ganpati Bappa Morya rangoli a neat look.
Step 5: Add Vibrant Colors
Once the base of the face is done, begin adding colors. Use bright colors like orange and yellow for the crown and ears, and a soothing shade of light pink or orange for the face and trunk. Gradually blend the colors to create a soft gradient that enhances the charm of the deity’s face.

Step 6: Work on the Crown and Ornaments
The crown and ornaments of Ganpati add grandeur to the design. Use golden yellow and orange rangoli powder to fill in the details of the crown. For the ornaments, you can mix white and yellow to create a shimmering effect. Pay attention to the small details, as they make the design come to life.
Also Read : 10 Easy Steps to Draw Lord Ganesha Drawing
Step 7: Create the “Ganpati Bappa Morya” Text
An essential part of this rangoli is incorporating the words “Ganpati Bappa Morya.” Using chalk or white powder, write these words at the bottom of the design. You can keep the text simple or stylize it according to your creativity. Filling the text with contrasting colors like blue and white will make it stand out.
Step 8: Add Floral Motifs Around the Rangoli
To complement the central figure of Ganpati, draw floral designs around the main image. Use bright colors like red, orange, and yellow to make these flowers vibrant. Lotus patterns are especially popular in rangoli designs and can be created with simple petal shapes.
Also Read : 10 Steps to Draw Easy Ganpati Drawing
Step 9: Use Decorative Borders
Borders enhance the visual appeal of the rangoli design. Create a decorative border around the Ganpati Bappa Morya rangoli using intricate patterns like dots, swirls, or geometric shapes. Use contrasting colors to make the border pop and highlight the central figure.
Step 10: Final Touches and Detailing
Lastly, add finishing touches to your rangoli. Use a sieve to sprinkle finer rangoli powder for smooth edges and a uniform texture. If you want a more detailed rangoli, you can use a toothpick to carefully shape fine details like the eyes, ornaments, and floral designs. Step back, and admire your beautiful Ganpati Bappa Morya rangoli.
Ganpati Bappa Morya Rangoli Design: Bringing Joy and Devotion
- The phrase “Ganpati Bappa Morya” holds deep spiritual significance, and incorporating it into your rangoli design is a heartfelt way of expressing devotion. Ganpati Bappa Morya rangoli designs not only reflect creativity but also infuse positive energy into the space. Using vibrant colors and intricate patterns, you can make your rangoli a visual treat for everyone who visits your home during the festive season.
Easy Ganpati Bappa Morya Rangoli Design: Ideal for Beginners
- For those who are new to rangoli art, creating an easy Ganpati Bappa Morya rangoli design is the perfect place to start. You can keep the design simple by focusing on Lord Ganesha’s face and adding a few floral patterns around it. The key is to choose bright colors and practice patience while filling in the design. Even a basic design can look stunning when done with love and dedication.
Creating a Ganpati Bappa Morya rangoli during Ganesh Chaturthi is not only a delightful activity but also a way of welcoming Lord Ganesha into your home with respect and devotion. With these 10 easy steps, you can make a beautiful rangoli that resonates with the spirit of the festival and adds a vibrant touch to your celebrations.
Ganpati Bappa Morya Rangoli FAQ
What materials do I need to create a Ganpati Bappa Morya rangoli?
To create a Ganpati Bappa Morya rangoli, you’ll need colored rangoli powders in various shades (like red, orange, yellow, green, white, and blue), a chalk or white rangoli powder to outline the design, a small sieve for smooth application, and a Ganpati stencil or a reference image. You may also use some basic tools like toothpicks or brushes for fine detailing.
How can beginners create an easy Ganpati Bappa Morya rangoli design?
Beginners can start with a simple design by focusing on the key features of Lord Ganesha’s face, like the trunk, ears, and crown. Use stencils if necessary to get an accurate shape. Keep the surrounding floral motifs simple, and use vibrant colors to make the design stand out. Writing “Ganpati Bappa Morya” below the image adds a devotional touch while keeping the overall design manageable.
What are some popular colors used in Ganpati Bappa Morya rangoli designs?
The most popular colors for a Ganpati Bappa Morya rangoli include red, orange, yellow, white, green, and blue. Red and orange are often used for the crown and ornaments, while softer shades like pink or peach are used for the face of Lord Ganesha. White is generally used for outlines and detailing, while vibrant floral patterns often feature bright colors like red and yellow.
Why is the phrase ‘Ganpati Bappa Morya’ important in rangoli designs?
The phrase “Ganpati Bappa Morya” is a popular chant during Ganesh Chaturthi, invoking blessings from Lord Ganesha. Including this phrase in your rangoli design is a way to express devotion and faith. It reflects the joy and reverence surrounding the festival, making the design more meaningful and spiritually significant.
Can I use a stencil to create a Ganpati Bappa Morya rangoli?
Yes, using a stencil is a great way to ensure that the Ganpati Bappa Morya rangoli design is accurate and neat, especially for beginners. You can either buy pre-made stencils of Lord Ganesha or make your own by tracing a picture onto paper or cardboard. The stencil can help you get the basic outline, which you can then fill with vibrant colors.