

Mehndi Design : Mehndi, also known as henna, is a form of body art that has been practiced for centuries in various cultures around the world. From weddings to festivals, mehndi is a cherished tradition that adds beauty and elegance to any occasion.
If you’ve ever been intrigued by the intricate designs adorning someone’s hands or feet, you might be eager to try your hand at creating your own mehndi masterpiece.
Fear not! In this guide, we’ll walk you through the process of creating stunning mehndi designs step by step.
Step 1 : Prepare your materials for Mehndi Design
- You’ll need henna paste, which you can either buy pre-made or mix yourself using henna powder, lemon juice or tea, sugar, and essential oils (like eucalyptus or lavender).
- You’ll also need a small cone or applicator bottle for applying the henna, cotton balls, and lemon-sugar sealant (mix lemon juice and sugar to create a sticky solution).
Step 2 : Prepare your skin
- Clean the area where you’ll be applying the mehndi design with soap and water. Make sure your skin is free of any lotions or oils, as they can interfere with the henna’s ability to stain.
Step 3 : Choose your design
- Decide on the design you want to create. You can find inspiration from online resources, books, or create your own design.
- Start with simpler designs if you’re a beginner and gradually progress to more intricate patterns as you gain confidence.
Step 4 : Practice drawing
- Before applying the henna to your skin, practice drawing the design on a piece of paper.
- This will help you familiarize yourself with the pattern and perfect your technique.
Also Read : 7 easy steps to draw Naruto Drawing
Step 5 : Fill the cone or applicator bottle
- If you’re using a cone, fill it with henna paste and secure the tip with a rubber band or tape. If you’re using an applicator bottle, fill it with henna paste and attach the applicator tip.
Step 6 : Apply the henna
- Start by applying the central motif of your design. Squeeze the cone or bottle gently to release the henna paste onto your skin.
- Use steady, even pressure to create smooth lines and shapes. Take your time and work slowly to avoid mistakes.
Step 7 : Fill in the design
- Once you’ve outlined the main elements of your design, fill in the empty spaces with smaller details like dots, swirls, and shading.
- Again, work slowly and carefully to achieve clean, crisp lines.
Step 8 : Let the henna dry
- Allow the henna paste to dry completely on your skin. This usually takes 1-3 hours, depending on the thickness of the paste and the temperature and humidity of your environment.
Step 9 : Seal the design
- Once the henna is dry, apply the lemon-sugar sealant over the design using a cotton ball or a small brush. This will help the henna paste adhere to your skin and prevent it from flaking off too soon.
Step 10 : Wait for the stain to develop
- Leave the henna paste on your skin for as long as possible, ideally overnight. The longer you leave it on, the darker the stain will be. Avoid getting the design wet during this time.
Step 11 : Remove the dried henna paste
- Once the henna paste has dried completely, gently scrape it off with your fingers or a blunt object. Avoid using water to remove the paste, as this can lighten the stain.
Step 12 : Moisturize
After removing the dried henna paste, apply a small amount of oil or moisturizer to the mehndi design to help hydrate your skin and prolong the life of the stain.
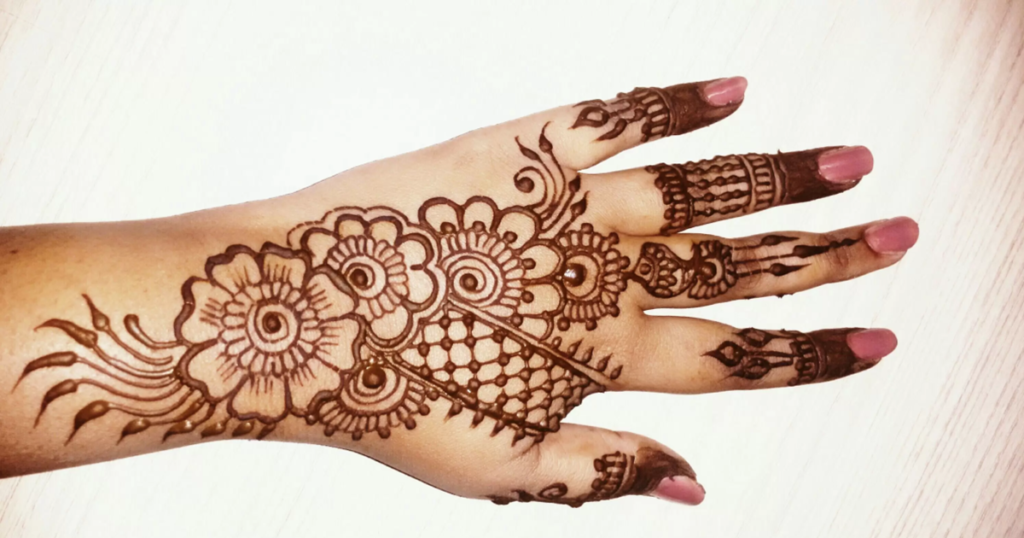
That’s it! You’ve successfully created your own mehndi design. Enjoy your beautiful and intricate artwork!
Top 10 Mehndi/henna in India
| Brand Name | Description |
|---|---|
| Godrej Nupur | Known for its herbal henna powder enriched with natural ingredients like hibiscus, amla, and bhringraj. |
| Shahnaz Husain | Offers a range of henna-based hair color products, known for their quality and effectiveness. |
| VLCC | Provides henna powders and hair color creams infused with natural ingredients to promote hair health and shine. |
| Biotique | Offers Ayurvedic henna powders made from pure henna leaves, known for their conditioning and coloring properties. |
| Kama Ayurveda | Known for its organic henna powder sourced from Rajasthan, offering natural coloring and conditioning benefits. |
| Jovees | Offers henna-based hair color creams and powders enriched with herbal extracts for nourishment and color retention. |
| Indus Valley | Provides organic henna powders free from harmful chemicals, suitable for both hair coloring and body art applications. |
| Nature’s Essence | Offers herbal henna powders infused with natural ingredients like aloe vera and shikakai for enhanced hair care benefits. |
| Patanjali | Known for its natural henna powders made from high-quality henna leaves, offering rich and lasting color to the hair. |
| Banjara’s | Provides henna powder products formulated with traditional herbs and spices, offering natural conditioning and coloring. |
These brands are renowned for their quality henna products and are trusted by consumers across India for their effectiveness in hair care and body art.
I loved as much as you will receive carried out right here.
The sketch is tasteful, your authored subject matter stylish.
nonetheless, you command get got an shakiness over that you wish
be delivering the following. unwell unquestionably come more formerlky agyain as exactly the same
nearly very often inside case you shield this hike. https://Www.Waste-NDC.Pro/community/profile/tressa79906983/
I loved as muich as you will receivve carried ouut right here.
The sketch is tasteful, your authored subject matter stylish.
nonetheless, you command get got an shakiness over
that you wish be deliveringg the following. unwell unquestionably come
more formerly again as exactly the same nearly vedry oftwn inside case you shield this
hike. https://Www.Waste-NDC.Pro/community/profile/tressa79906983/